Understanding a Full-Frame vs. a Cropped-Sensor Camera

Lately I have been asked a lot of questions about cameras, which one to buy and what the difference is between a full-frame camera vs. a crop-sensor camera. SO I decided to spell it out simply so you can understand the difference between cameras that have a full-frame sensor and a crop-frame sensor. 

On a full-frame camera (a camera with a full-frame sensor) this is referring to a sensor-size that is equal to 35mm film. In other words, the rectangular sensor that captures your image will record the same area as 35mm film will (roughly 24mm x 36mm). 

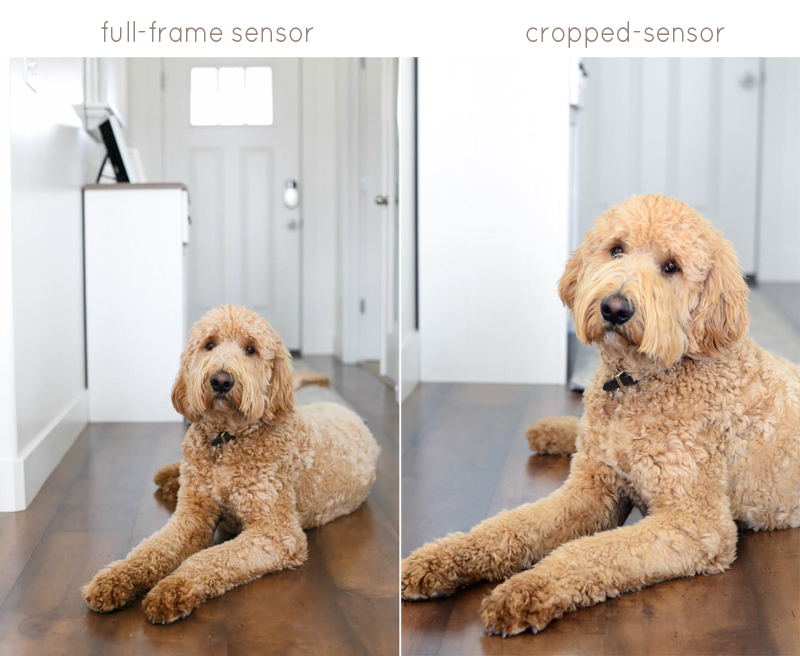
A cropped-sensor refers to any camera that has a smaller sensor than that of a full-frame camera. Most entry-level cameras have this cropped sensor. If you were to take the same photo with a full-frame camera, using the same lens from the same distance as a crop-frame camera, the cropped-frame camera would capture a smaller field of view; this means a smaller piece of the scene projected by your lens. The full-frame camera will get more of the edges of the same scene, or more 'real-estate'. 

You can see the difference in the example below. The image on the left was taken with a Canon 5D Mark III and the image on the right, a Nikon D7000. Both cameras had a 50mm lens, shot with an aperture of f/2.8 and were taken from the same spot (the same distance from the dog). 

Understanding the Difference Between a Full-Frame Sensor Camera vs. a Cropped-Sensor Camera - www.mommatography.com

Every cropped-sensor camera has a crop factor of either 1.3 x, 1.5x or 1.6x (the field of view gets smaller). This means your sensor will be a smaller version of a full-frame sensor. 

Let's take a look at what each option has to offer to figure out which one is right for you. 

Full-Frame

A full frame sensor will give you better performance in low light scenarios, allowing you to have a better ISO performance at high ISO numbers. They also give you a little better image quality than a crop sensor. This is why they are considered "professional camera bodies" and most professional photographers pick full-frame cameras over cropped. Full-frame also allows a wider-angle of view which can be helpful for things like landscape or architectural photography. A full-frame DSLR will also give you a slightly more shallow depth-of-field than a crop sensor DSLR. 

Advantages: 

  • Better low light performance

  • Shallower depth of field

  • Better dynamic range

  • Wider angle of view

Cropped-Frame

Having a cropped sensor will lose that extra 'real-estate' in your photo. With a wide-angle lens on a crop-sensor camera, you won't get the widest field of view like you would with a full-frame camera. On the other hand, a crop-sensor DSLR paired with a telephoto lens will give you more distance from this smaller field of view. For example, if you have a 200mm lens on a crop-sensor camera, you apply the 1.5x crop factor to the lens (200 x 1.5 = 300). This would really get you 300mm focal length for the subject you are shooting, or in other words, FREE ZOOM! This can be very beneficial for shooting subjects that are far away, such as getting closer shots of an athlete in a sporting event or for wildlife photography. We'll talk more about the crop factor and lenses later on. 

Advantages: 

  • More affordable

  • Wider range of lens selection

  • Increased focal length

  • Lighter and smaller 

For most people, the decision is based upon cost. Think about the advantages of both, how they apply to what you photograph and what your budget for photography is in order to make the best decision.

In my next post I will teach you how to understand the way lenses work with both full-frame and crop sensor cameras. This can be confusing to understand so hopefully I can make it more simple for you!


Tips for Photographing Kids - Portraits in their Room

Spring is just around the corner which means the days are longer, brighter and spring cleaning is on the minds of many. I feel like I am nesting (for no reason, really) and find myself wanting to organize every nook and cranny in my home! Besides thinking about every closet I want to redo, I've also found myself wanting to cherish the stages my kids are currently at. We've had a lot of fun playing together lately, we are SO excited for springtime and I just can't get enough of them. 

So my twins went through about a week spurt where they decided they didn't want to argue over toys and realized they could be best friends (unfortunately, it didn't last very long... now it's hit or miss). The whole morning I was free to observe and not be a referee! Hallelujah! It was so much fun to sit back in the doorway while they laughed, played princesses, snuggled, jumped around, tucked each other in and sang at the top of their lungs in their room. They didn't even know I was there with my camera, documenting a memory that meant so much to me. 

Tips for Photographing a Nursery or Kids Room - www.mommatography.com

This led me to realize how much I love having photos of them in their room! So I'm posting another challenge out there - try and capture the essence of your children in their room(s). Even if it's just a small corner of a shared room; these are moments and details in your life that you won't want to forget. PS: How awesome is the artwork my friend made in this little guys' nursery?   

Tips for Photographing a Nursery or Kids Room - www.mommatography.com

Think of getting different angles and getting on their level. Be creative!

Tips for Photographing a Nursery or Kids Room - www.mommatography.com

If you have a toddler, try and get some candid shots of them playing with a favorite toy, snuggled with a favorite blanket or just exploring and playing in their territory.

Portraits of Kids - Fun Photos in their Room - www.mommatography.com

Maybe you intrude on quiet time to remember what their favorite book was when they were three, six or even ten years old.

Portraits of Kids - Fun Photos in their Room - www.mommatography.com
Tips for Photographing Kids in their Element - www.mommatography.com

Try and let a lot of that fresh spring daylight into the room (try to bump up your ISO number to let in more light). I love being able to remember the everyday details and routine by documenting little ones in their element, in their room.  

Portraits of Kids - Fun Photos in their Room - www.mommatography.com

Just let them do their thing so it's not planned out and they don't feel pressure; you'll get more photos that are raw and real. Kids are hilarious, entertaining and full of life. They are my favorite subject matter, hands down. Take your camera out a little more often while they play and practice getting better! You won't regret it!


Fun Portrait Tips for Kids - Photograph Kids in Their Element - www.mommatography.com

Celebrate St. Patrick's Day with a Green Smoothie!

This is how I do St. Patrick's Day. Simple, healthy and the kids love it! I love that you can pack in a ton of greens into a smoothie and kids don't even know they are in there. Well, my kids do, but they are a little strange and sometimes eat spinach plain while we pile it on our turkey sandwiches! If your kid hates green veggies, this is an easy way to still get them the great nutrients. 

Green Smoothie Recipe - St. Patrick's Day Smoothie - www.mommatography.com

Green Smoothie Recipe

  • 1/2 an orange

  • 1/4 c. orange juice

  • 3/4 c. fresh spinach

  • 1/4 c. greek yogurt

  • 1/2 a banana

  • 1/4 c. frozen peaches

  • 4-5 ice cubes

Put all ingredients in blender and blend until smooth! By the way, I never measure anything. I just throw it in there, so this is a guess on amounts. HA! I do so many variations of this smoothie every week. I'll alternate adding frozen berries, fresh strawberries, kale, lime juice, and even substitute the orange juice for coconut water. Who doesn't love having a smoothie for breakfast?

And who am I kidding about my kids only having a green smoothie today? They are having a green shamrock pancake party with friends for lunch! :) I did the green eggs and ham thing once or twice but eating green eggs kind of grosses me out. So we stick with the green smoothie and pancake plan. 

Green Smoothie Recipe - St. Patrick's Day Smoothie - www.mommatography.com

Hope you have a fun holiday!

Pin it:

Green Smoothie Recipe that Kids Love! - www.mommatography.com
 

Feature Friday - Valory Jean Photography

It's Feature Friday! This has to be my favorite part of this blog. I love being able to associate with other artists who have so much to offer; I hope you can take something from them to help inspire you, whatever direction you might be heading. Today I have the privilege of sharing with you some great tips from an amazing friend of mine and a very talented photographer, Val Dahlin. Enjoy!!


Hi! I’m Val Dahlin! And I own Valory Jean Photography! I’m a mom of three wonderful and crazy girls and the wife of the greatest guy on earth! I grew up in Oregon, and moved to Utah after my husband and I were engaged, and we have lived here ever since. I have always loved photography, but didn’t start investigating it more until after I had my first baby. I wanted to take photos of her so that I could remember all the things that she did when she was little. I’m a terrible journal writer so photography was how I documented things. I realized that I loved it and decided to start taking photos of families and children. I had someone inquire with me about a wedding and I said yes (I honestly don’t know what I was thinking…but that’s how it all began). I have had my photography business now for 6 years. It has been a lot of hard work, but I love it so much. 

Friday Feature with Valory Jean Photography - www.mommatography.com


Photographing weddings and families is my passion. I love all the good feelings surrounding a wedding. It’s an all day celebration of love! Who doesn’t want to be in an environment like that for a day? I love my wedding clients so much. I have made some amazing friends throughout the years who started out as clients.

Friday Feature with Valory Jean Photography - www.mommatography.com

I’ve recently started going to people’s homes to photograph their family. That has been so much fun! I know from personal experience that family picture day is the worst day of the year. Hahaha! It’s stressful getting everyone ready, getting yourself ready, keeping everyone happy and trying to keep the kids behaved. It’s a lot of hard work. I feel like if I photograph families in a familiar place and not worry about the posing and just focus on the family and kids and having fun, that it goes so much smoother and isn’t as stressful. 

Friday Feature with Valory Jean Photography - www.mommatography.com


There are a lot of things I wish I had known or had taken more seriously when I first started my business. Here are a few things I wish I would have known when I first started. 

  • The first thing is to know the business aspect of having a photography business. There is so much information that you need to have when doing so. You need a business license, pay quarterly sales tax, keep track of all your receipts and income, come up with contracts, and so much more! I couldn’t believe all the things I needed to do and keep track of to be a legitimate business.

  • Second, I would have invested in branding, instead of just creating a logo in Photoshop. Your brand says so much about you as a person and your photography. It is kind of like a first impression of you as a photographer. Graphic designers are able to help you create something specifically for you that reflects who you are. I’m still working on this and hoping to fine tune my brand to bring in my ideal client and for people to see who I am and what I can capture for them, even before they meet me.

  • Third, I would have second shot weddings for other photographers, before I ever shot one on my own. When you are a photographer at a wedding it is much different than being a guest. I shot a lot of weddings before I ever second shot with a more experienced photographer and it’s one of my biggest regrets. I think I would have been a better photographer faster if I had taken the time to shoot with other wedding photographers first.

  • This brings me to number four; how important my job as a wedding photographer really is. Yes, I make pretty photos and capture memories for my clients, and it helps take care of my family. But it’s so much more than that. These are the photos that your clients will show their children and grandchildren. These are the photos they will look to when a close family member passes away. It’s easy to get caught up in the day and moving things along and staying on track with their timeline, but always have in the back of your head, “What more can I capture from this moment? Are there things going on around me that they will want to remember? Is there a family member who needs special attention and time with the bride and groom?” Especially grandparents, parents and siblings. This is difficult to do sometimes, but it’s so important.

  • Lastly, I wish I had known about Lightroom!! Photoshop is great, and I still use it for some things. But Lightroom changed my life. Once I learned how to use it properly it cut down my post processing by half the time! That’s insane, when you are editing hundreds of photos from a wedding. It took me several years to figure out that I was spending way too much time in Photoshop. So start with Lightroom! You will be happy you did. 

Friday Feature with Valory Jean Photography - www.mommatography.com

When photographing people, there are so many things to think about; lighting, posing, timing, location, angles... the list can go on and on.

For the images below, Val takes us behind the scenes to see how she got the shot!

Feature Friday with Valory Jean Photography - www.mommatography.com


Dana + Christian: This is one of my favorite spots at the Salt Lake City Temple. We started the session about two hours before sunset. I like starting then, because the sun is a little lower in the sky and isn’t as harsh, especially once you get closer to sunset. I usually like to look for places where there are trees and the branches help diffuse the light a little more. With the pose it was super simple. Hold hands and look at each other. Usually the couple automatically smiles, which is nice, because when I don’t have to tell them to, it’s usually a genuine smile. 

Feature Friday with Valory Jean Photography - www.mommatography.com

Emily: We did Emily’s bridal session in Justin Hackworth’s studio in Provo. It was a windy day, and it was threatening to rain. Most of the session I had her, in some way, facing the window or part of her body towards it, whether is was her face or her whole body, so I could get that pretty natural light coming through the window. In this photo her body is facing the window but she is looking at me. So part of her face is lighted by the natural light. Hands behind her back and her hips forward just a little bit. 

Feature Friday with Valory Jean Photography - www.mommatography.com

Llexa + Jeremy: We were in downtown Salt Lake in a neighborhood for this shoot. I just had them sit next to each other and talk and look at each other. Every couple does something different when you ask them to do something, so I take photos of them while they are talking, and move around them to get different angles. And if they aren’t touching each other I ask them to hold hands or put a hand on the other person’s leg to get some interaction started. 

Feature Friday with Valory Jean Photography - www.mommatography.com

Zoe + Jordan: This is one of my favorite photos. Even if you time shoots perfectly you don’t always get the pretty golden hour sun. It had rained and was cloudy all day, and then about 10 minutes before sunset the sun came out and created this gorgeous light. I had them get close, she held her veil toward me, and I squatted down just a tiny bit so I could get the sun just right. I wanted the sun glare but not too much so I had to adjust where the sun was partially behind Jordan’s chin so I could get a little sun, but not all of it. 


To see more of Val's work, visit her website here. Follow her on Facebook and be sure to check out her feed on Instagram (@valoryjean)! 

Friday Feature with Valory Jean Photography - www.mommatography.com

Avocado, Tomato & Cayenne Melt

It's time to lighten things up with a good recipe. I hope the last few posts weren't information overload for you learning how to take sharper photos! So this week we're just going to have fun. I also have an awesome feature coming up on Friday so stay tuned!

This incredibly simple yet delicious open-faced sandwich came from my sweet Grandma, Nola Rae. My Grandma doesn't cook. Not even a little. She was known for always having gum balls, fireballs and candy bars in her purse. At night we'd snack on ice cream bars or frosted root beer floats in her den while watching an old classic movie or playing cards for hours. She tells everyone she never has to cook a day in her life; she's always been cooked for or stopped in at the family-owned restaurant in Mesa called Tia Rosa's. It is so good, I could eat there every day. Let's get back to the sandwich.

One summer while visiting, Grandma made us lunch in her little kitchen. I honestly have no idea where she came up with this idea, but my sisters and my mom and I were blown away by how much we loved it! It is SO easy to make, I almost always have these ingredients on hand and it's pretty healthy. I eat this multiple times a week for lunch. Thanks to my fun-loving Grandma even for just one recipe that I have already shared with many friends and family members. 

Avocado, Tomato and Cayenne Melts - Avocado, Tomato Sandwiches - www.mommatography.com

Avocado Tomato & Cayenne Melt

  • Slices of Bread (I LOVE using the thin-sliced Dave's Killer Bread from Costco)

  • A little mayo 

  • Cayenne pepper

  • Sliced tomatoes

  • Avocado slices

  • Sliced Cheese (I prefer extra-sharp cheddar, you can use any kind)

  • Salt & Pepper

Spread a thin layer of mayo on your bread. Sprinkle some cayenne pepper, depending on how much of a kick you like. If you're not a fan of things spicy, just do a pinch for flavor.  Layer avocado slices and top with 3-4 tomato slices. Sprinkle with salt and pepper and place slices of cheese over the top. Broil on high until the cheese is melted and bubbly, and the edges of the bread are slightly toasted. 

Avocado, Tomato and Cayenne Melts - Avocado, Tomato Sandwiches - www.mommatography.com

Try this using fresh garden tomatoes. It will knock your socks off!! These are just Roma tomatoes; I get so depressed when my tomato plants die and we have to buy them from the store again! 

Avocado, Tomato and Cayenne Melts - Avocado, Tomato Sandwiches - www.mommatography.com

Give them a try and I bet you'll be hooked like I am! 

Avocado, Tomato and Cayenne Melts - Avocado, Tomato Sandwiches - www.mommatography.com