sensor

Understanding a Full-Frame vs. a Cropped-Sensor Camera

Lately I have been asked a lot of questions about cameras, which one to buy and what the difference is between a full-frame camera vs. a crop-sensor camera. SO I decided to spell it out simply so you can understand the difference between cameras that have a full-frame sensor and a crop-frame sensor. 

On a full-frame camera (a camera with a full-frame sensor) this is referring to a sensor-size that is equal to 35mm film. In other words, the rectangular sensor that captures your image will record the same area as 35mm film will (roughly 24mm x 36mm). 

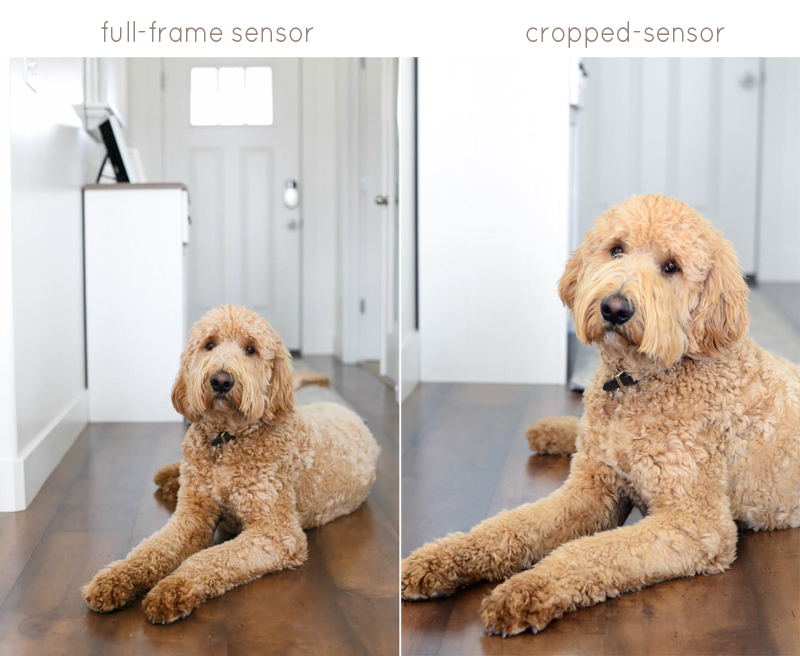
A cropped-sensor refers to any camera that has a smaller sensor than that of a full-frame camera. Most entry-level cameras have this cropped sensor. If you were to take the same photo with a full-frame camera, using the same lens from the same distance as a crop-frame camera, the cropped-frame camera would capture a smaller field of view; this means a smaller piece of the scene projected by your lens. The full-frame camera will get more of the edges of the same scene, or more 'real-estate'. 

You can see the difference in the example below. The image on the left was taken with a Canon 5D Mark III and the image on the right, a Nikon D7000. Both cameras had a 50mm lens, shot with an aperture of f/2.8 and were taken from the same spot (the same distance from the dog). 

Understanding the Difference Between a Full-Frame Sensor Camera vs. a Cropped-Sensor Camera - www.mommatography.com

Every cropped-sensor camera has a crop factor of either 1.3 x, 1.5x or 1.6x (the field of view gets smaller). This means your sensor will be a smaller version of a full-frame sensor. 

Let's take a look at what each option has to offer to figure out which one is right for you. 

Full-Frame

A full frame sensor will give you better performance in low light scenarios, allowing you to have a better ISO performance at high ISO numbers. They also give you a little better image quality than a crop sensor. This is why they are considered "professional camera bodies" and most professional photographers pick full-frame cameras over cropped. Full-frame also allows a wider-angle of view which can be helpful for things like landscape or architectural photography. A full-frame DSLR will also give you a slightly more shallow depth-of-field than a crop sensor DSLR. 

Advantages: 

  • Better low light performance

  • Shallower depth of field

  • Better dynamic range

  • Wider angle of view

Cropped-Frame

Having a cropped sensor will lose that extra 'real-estate' in your photo. With a wide-angle lens on a crop-sensor camera, you won't get the widest field of view like you would with a full-frame camera. On the other hand, a crop-sensor DSLR paired with a telephoto lens will give you more distance from this smaller field of view. For example, if you have a 200mm lens on a crop-sensor camera, you apply the 1.5x crop factor to the lens (200 x 1.5 = 300). This would really get you 300mm focal length for the subject you are shooting, or in other words, FREE ZOOM! This can be very beneficial for shooting subjects that are far away, such as getting closer shots of an athlete in a sporting event or for wildlife photography. We'll talk more about the crop factor and lenses later on. 

Advantages: 

  • More affordable

  • Wider range of lens selection

  • Increased focal length

  • Lighter and smaller 

For most people, the decision is based upon cost. Think about the advantages of both, how they apply to what you photograph and what your budget for photography is in order to make the best decision.

In my next post I will teach you how to understand the way lenses work with both full-frame and crop sensor cameras. This can be confusing to understand so hopefully I can make it more simple for you!


Understanding ISO!

If you've read my post on Learning How to Make a Good Exposure you'll remember that the three settings that determine your exposure are your ISO, along with Aperture and Shutter Speed. To make the most of your photos we need to understand how these three work together and in turn, create well-exposed images. 

ISO is a numerical exposure index created by the International Standardization Organization (there's no need to remember that, but just in case you play a trivia game with ISO as a question, you now know the answer). What you need to know is that inside your camera you have a sensor where your images are recorded. Your sensor gathers the light available and with it, creates an image. ISO is basically how sensitive your camera's sensor is to light, or how it processes that light into signals. 

HOW IT WORKS:

  • A higher ISO will allow you to take photos in low-lit situations. This will make your image BRIGHTER.

  • With a lower ISO you will need a well-lit scene in order to get a well-exposed image. This will make your image DARKER. 

HOW IT EFFECTS IMAGE QUALITY:

  • The lower your ISO is (i.e. ISO 200) the higher your image quality will be.

  • The higher your ISO is (i.e. ISO 3200) the more 'digital-noise' or grain will show. 

A higher ISO will let you shoot better exposures in darker settings, but as a trade off, you get more digital-noise. Digital-noise is when photos look grainy and less sharp or smooth.

Understanding ISO and Noise - www.mommatography.com

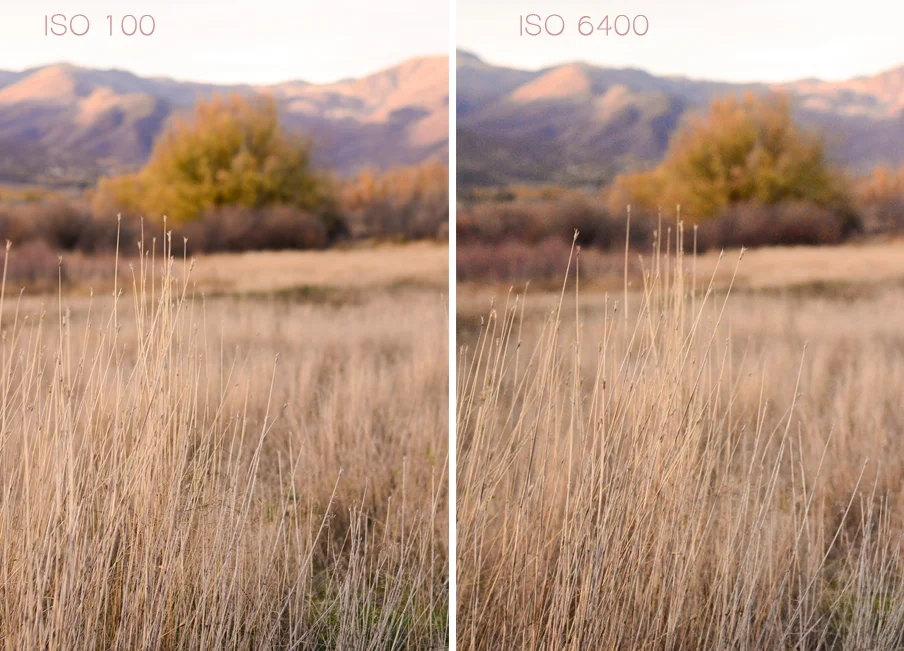
The cropped images below are zoomed into 66.7% so you can see the grain better. This is ISO 100.

Example of ISO 100 www.mommatography.com

This is ISO 6400. Although grainy, most DSLR camera sensors are improving when it comes to handling grain/noise at a higher ISO. This was outside before sunset with a decent amount of light, so the grain isn't as crazy as it would be if I were indoors in a dimly-lit setting.

Example of ISO 6400 www.mommatography.com

Below you'll see another zoomed-in example of a landscape shot at ISO 100 and ISO 6400. 

ISO 100 example
ISO 6400 example

These photos of my fuzzy friend Lando show how a higher ISO number lets in more light. My shutter speed and aperture stayed the same, and I just increased my ISO. 

Understanding ISO - www.mommatography.com

Feel free to use my following examples as a quick guide:

  • If I am shooting outside with plenty of sunshine, I keep my ISO around the lowest setting (this is typically ISO 100).

  • If I am in the shade, I'll find myself shooting a little higher between ISO 200-400.

  • If I am indoors in a well-lit situation, I shoot somewhere between ISO 400-600.

  • When I shoot around sunset or dusk and my subject is dark, I'll push my ISO somewhere between ISO 800-3200 if I am holding my camera. If I am shooting a nice landscape, I will use a tripod and set a longer shutter speed to let in more light. This will allow me to keep a lower ISO for better quality. 

  • I shoot around ISO 1600 or above if I am inside where it's dimly lit and I don't want to use my on camera flash.

Anything above ISO 1600 will start adding significant grain to your photos if you are inside in a darker setting. Some people don't mind a little grain in their photos. I actually like a little grain, especially if I'm shooting black and white. It can definitely add a little artistic flare to an image!