DIY Lego Gummies

This weekend we threw a Star Wars themed birthday party for my little guy; I cannot believe I have a five year old! The party was a huge success and we had a lot of fun with it. I thought it would be a perfect time to post a recipe for a really fun project for kids (or adults, let's be honest, these are pretty sweet)! I will also combine everything we've learned about aperture, shutter speed and ISO and give you some examples of how I shot some photos of these awesome edible legos. Legos always seem to find their way into kids mouths and these ones you can actually eat while you stack them and play! They turned out awesome.

DIY Lego Gummies - www.mommatography.com

All you need for this recipe is three key ingredients, and your lego molds.

Lego & Star Wars Gummy Molds

We bought ours here on amazon. We also got a star wars pack, which were seriously the coolest. It was also convenient to have squeezable condiment bottles like these, to help pour the hot liquid into the molds. Here are the ingredients you need: 

  • Jell-0

  • Karo corn syrup

  • Unflavored gelatine (The small Knox box comes with 4 packets)

  • Water

  • Silicone lego mold

In a measuring cup, combine 1/2 cup cold water with 1/4 cup corn syrup. Stir to dissolve and pour into a pot on the stove. Don't turn on heat yet. Add 2 packets of unflavored gelatin and mix in your packet of Jell-O. Stir it slowly with a whisk to let it all set in. Set your stove to medium heat and stir every minute or two for 5-10 minutes. When the gelatin is completely liquified, the syrup is ready to pour into the molds. It will be very hot, so be careful not to spill. If you have bubbles or gelatin lumps, you may pour the liquid into a heat-resistance container and scrape the bubbles/lumps off the top, and then pour into your molds. If you have bubbles that rise to the top of the molds, you can scrape off the bubbles there as well to make your gummies turn out more smooth. Allow at least five hours to set.

I didn't get to photograph the process because we made these at 1:30 AM (crazy I know, the life of a parent). For the lego molds above and this image below I shot with my 50mm f/1.8 lens and these were my settings: aperture: f/3.2, shutter speed: 1/200, ISO: 800. I always try to shoot close to natural window light, and use a shallow depth of field to get the background to blur and bring the focus in on the details of the food or product I am shooting. I shot on my hardwood floor, and in Lightroom (my editing software) added some contrast and darkened the edges of the photo a little bit to make the subject pop. 

DIY Lego Gummy Molds - www.mommatography.com

If you want to see more about the gummy legos, like how to make them interlocking, check out the instructions here. We made five different batches to get a variety of colors for the kids to play with. 

The gummies come out of the molds really easily, and the details are perfect! For these images I shot right in front of my sliding glass door. My settings were aperture: f/3.2, shutter speed: 1/125, ISO: 1250. 

DIY Star Wars Candy - www.mommatography.com
DIY Star Wars Gummy Candy - www.mommatography.com

Keep practicing changing your aperture and shutter speed, either on Aperture Priority, Shutter Priority, or be really brave and give Manual Mode a try! On Manual you will select all of your settings, Aperture, Shutter Speed and ISO. It takes a little time to catch on to switching all three settings for one shot, but I promise you will love it once you get it!


Best Beginner DSLR Cameras

It's November! Black Friday is approaching quickly, as well as Christmas. For a lot of people, this means thinking about upgrading or investing in a DSLR camera. It can be overwhelming sometimes to try and decide which DSLR camera to buy. Nikon and Canon are leading the industry, even though some companies such as Sony are quickly catching up. When it comes down to it, both Nikon and Canon have great technology, design and functions. Canon seems to be a little more popular as far as sales goes. You really can't go wrong with either brand, and if you are just starting out, you can almost close your eyes and point to one of their camera bodies from the last two years to present, and absolutely love it.

It is important to remember that camera bodies are remarkable now-a-days. Investing in a good lens is where you will notice the difference in image quality. Prime or fixed lenses have great glass and create sharper images than zoom lenses that have moving parts. Think about what kind of photography you plan to do in the future, and what kind of lens/lenses you might need to save up for to get you the best results. If you already have a lens or two from a certain brand, it would be smart to go with that brand. I highly recommend adding on a 50mm f/1.8 prime lens to begin with. These retail for around $100 with canon, $200 for nikon. This is an extremely affordable lens that can take great portrait, product and food shots. The low aperture on this lens will give you a more shallow depth of field that people love. Also think if family members or friends have gear you might want to share with; it would be beneficial to get the same brand as them. Most friends and family I know usually pick between Canon and Nikon, so my recommendations are based between these two brands.

Here is my guide for the best DSLR cameras for beginners. All of these are under $1,000.

Best DSLR Cameras for Beginners - www.mommatography.com

1. Nikon D3300 - Price $446.95 (with kit lens on amazon)

  • 24.2 Megapixel CMOS DX-format sensor

  • 5 frames per second

  • 11 Auto Focus points with 3D tracking

  • ISO 100-12800 +

  • 1080 HD video / 3" LCD screen

  • Easy panorama mode & a beginner friendly guide mode on camera

  • Wi-Fi enabled (send photos wirelessly to your phone or tablet)

With the built-in beginner guide (on screen instructions/descriptions of settings), superior image and video quality and access to hundreds of Nikon lenses at that kind of price - this is a great pick. This camera controls the noise/grain in photos taken at a higher ISO very well (find out why ISO directly relates to image quality in my previous post Understanding ISO). It is also light-weight and pretty small for those looking to lighten their load. 

2. Canon EOS Rebel SL1 - Price $499.00 (with kit lens on amazon)

  • 18 Megapixel APS-C CMOS sensor

  • 4 frames per second continuous shooting

  • 9 point Autofocus system

  • ISO 100-12800 + 

  • 1080 HD video

  • 3" touch panel LCD screen

  • Movie Servo AF (continuous focus tracking while recording video)

If you're searching for a smaller DSLR body, this is also great pick. This canon offers auto focusing while recording video which is awesome, and an improved live-view mode. 

3. Canon T5i - Price $649.00 (with kit lens on amazon)

  • 18 Megapixel APS-C CMOS sensor

  • 5 frames per second continuous shooting

  • 9 point Autofocus system

  • ISO 100-12800 +

  • 1080 HD video

  • 3" articulating touch panel LCD screen

  • Movie Servo AF (continuous focus tracking while recording video)

This is a great Canon if you're going to take photography further than just a basic first-step DSLR. There is a T6i out, but the battery life is weaker and it struggles to track movement (no AF in live view). I'm not sure the extra Megapixels would make the T6i worth the extra money. The T5i comes with an upgraded kit lens, which is well worth buying this model over the T4i (which had some issues with the grip, otherwise almost identical to the T5i). 

4. Nikon D5500 - Price $796.95 (with kit lens on amazon)

  • 24.2 Megapixel DX-format CMOS sensor

  • 39-point Autofocus system

  • 5 frames per second continuous shooting

  • ISO 100-25,600

  • High resolution, fully articulated 3.2" LCD touch screen

  • Wi-Fi (share images to phone/tablet wirelessly) 

The D5500 is comparable to the D3300 when it comes to image quality, but boasts some of the newer features such as the tilting LCD screen, a more expansive Autofocus system, longer battery life and Wi-Fi if those are important to you. It also has a better grip making it easier to hold. If you want to save a couple hundred bucks, check out the Nikon D5300. The D5500 is almost the same camera, it just basically adds the touch screen and a longer battery life. 

If you're hoping to save a little more on a DSLR, you can always look into the predecessors of some of these models or look into buying used gear. It can be a risk, but you can also luck out and get great deals from others wanting to upgrade. If you can't decide between the lower priced Nikon D3300 vs. the Canon SL1, I'd recommend the D3300. Not just because I'm a Nikon shooter :) read more about that comparison here.

If you're willing to spend a little more, I also love the Nikon D7000 (now just around $500 for the body) and the D7100 is the more expensive upgrade (around $800 for the body), with the newest model the D7200 (around $1100 for the body) if you are wanting a step closer to the professional DSLR cameras. All three of these are great options. The Canon 70D is also a great option on this level (around $1200 with an 18-55mm kit lens).

Feel free to visit my contact page if you have any further questions about which camera is right for you!

Source - www.amazon.com


Understanding ISO!

If you've read my post on Learning How to Make a Good Exposure you'll remember that the three settings that determine your exposure are your ISO, along with Aperture and Shutter Speed. To make the most of your photos we need to understand how these three work together and in turn, create well-exposed images. 

ISO is a numerical exposure index created by the International Standardization Organization (there's no need to remember that, but just in case you play a trivia game with ISO as a question, you now know the answer). What you need to know is that inside your camera you have a sensor where your images are recorded. Your sensor gathers the light available and with it, creates an image. ISO is basically how sensitive your camera's sensor is to light, or how it processes that light into signals. 

HOW IT WORKS:

  • A higher ISO will allow you to take photos in low-lit situations. This will make your image BRIGHTER.

  • With a lower ISO you will need a well-lit scene in order to get a well-exposed image. This will make your image DARKER. 

HOW IT EFFECTS IMAGE QUALITY:

  • The lower your ISO is (i.e. ISO 200) the higher your image quality will be.

  • The higher your ISO is (i.e. ISO 3200) the more 'digital-noise' or grain will show. 

A higher ISO will let you shoot better exposures in darker settings, but as a trade off, you get more digital-noise. Digital-noise is when photos look grainy and less sharp or smooth.

Understanding ISO and Noise - www.mommatography.com

The cropped images below are zoomed into 66.7% so you can see the grain better. This is ISO 100.

Example of ISO 100 www.mommatography.com

This is ISO 6400. Although grainy, most DSLR camera sensors are improving when it comes to handling grain/noise at a higher ISO. This was outside before sunset with a decent amount of light, so the grain isn't as crazy as it would be if I were indoors in a dimly-lit setting.

Example of ISO 6400 www.mommatography.com

Below you'll see another zoomed-in example of a landscape shot at ISO 100 and ISO 6400. 

ISO 100 example
ISO 6400 example

These photos of my fuzzy friend Lando show how a higher ISO number lets in more light. My shutter speed and aperture stayed the same, and I just increased my ISO. 

Understanding ISO - www.mommatography.com

Feel free to use my following examples as a quick guide:

  • If I am shooting outside with plenty of sunshine, I keep my ISO around the lowest setting (this is typically ISO 100).

  • If I am in the shade, I'll find myself shooting a little higher between ISO 200-400.

  • If I am indoors in a well-lit situation, I shoot somewhere between ISO 400-600.

  • When I shoot around sunset or dusk and my subject is dark, I'll push my ISO somewhere between ISO 800-3200 if I am holding my camera. If I am shooting a nice landscape, I will use a tripod and set a longer shutter speed to let in more light. This will allow me to keep a lower ISO for better quality. 

  • I shoot around ISO 1600 or above if I am inside where it's dimly lit and I don't want to use my on camera flash.

Anything above ISO 1600 will start adding significant grain to your photos if you are inside in a darker setting. Some people don't mind a little grain in their photos. I actually like a little grain, especially if I'm shooting black and white. It can definitely add a little artistic flare to an image! 


Happy Halloween!

This year we used the garage as a natural-lit studio to take some portraits of our little super-heroes and their buddies! Try hanging a sheet or a blanket between two ladders, chairs or anything tall, and shoot with a shallow depth of field (a lower f/stop number) to blur some of that background away. I shot these using my 50mm lens, with an aperture of f/3.2 and my shutter speed was 1/320!

diy halloween city portrait
captain american halloween portrait
DIY city backdrop for portaits

Happy Halloween!

Quick and Simple Tips for Taking Better iPhone Pictures!

If you are like me, you'll quickly realize that it is unfortunate that your nice DSLR camera doesn't fit in your pocket. It's probably not on the perfect setting, sitting next to you ready to go when your child decides to stand up and walk for the first time, or takes off on his bike with no training wheels on his first try ALL BY HIMSELF (yes, that really happened). Thank goodness we have pretty sweet phones nowadays that have amazing capabilities and seem to follow us everywhere we go! Here are some quick tips to take better photos with your iPhone.

Great Simple Tips for Better iPhone Photos! www.mommatography.com

8 Simple Tips for Better iPhone Photos

1. This one is a cinch and makes a huge difference. Your phone will automatically focus and expose for your scene as best it can. If you want to tell your phone to focus or expose for a certain area of your image, like a person's face, simply press your finger on that area of the photo (see the image above) and it will refocus and expose for that square area. I use this all the time, especially if my background is bright but I want my subject to be brighter. Notice the difference below.

take better iphone photos

Pretty exciting, right? On the next example, the photo on the left was what my camera calculated as a balanced exposure, but I wanted my subject brighter (even though dark bowling alleys rarely give you great iPhone photos). I simply pressed my finger on my subject and it adjusted the exposure for me. These are both straight from the camera with no edits. The images on the right give me a better starting point for editing. 

Take Better iPhone Pictures

2. You can also lock the focus and exposure for a specific part of your image by HOLDING your finger down until you see AE/AF LOCK appear at the top of your screen in a yellow box. This is helpful if you want to focus or expose for a moving subject, or when there's too much going on in the scene that your camera isn't sure what to lock onto. 

3. HOLD STILL! Think about a tripod; rest your arms on a table or lean against a wall if you need to! If you're moving while shooting, your photo will definitely be blurry. 

4. The volume up button on the side of your phone acts as a shutter. Sometimes it is much easier to press this to take a picture! You can also use the volume + button on your HEADPHONES to take a picture! Pretty cool, right? They act as a shutter release cable, so you can totally eliminate camera shake. 

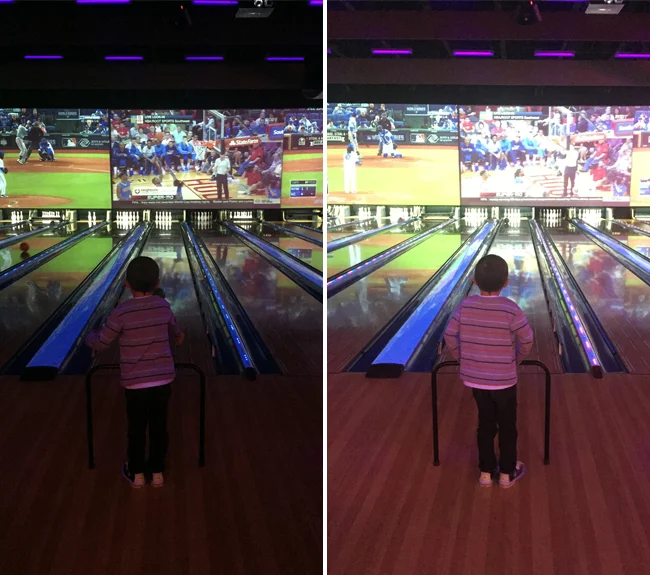
5. This tip is pretty funny, but I use it all the time. To avoid selfies that don't look so great, or seem to have camera shake from trying to hold your phone AND press a button, flip to the front-facing camera on the screen of your phone and set a 3 second timer. That way, you can press the timer, hold your arm out as far as it goes, and have a few seconds to adjust the angle your shooting at and compose a little better. I see this as a sort of 'live-view' mode on my iPhone, when I'm trying to take a picture of myself and others. It's totally silly, but it helps. By the way, the camera on your screen has a much lower resolution (lower-quality) than the main camera on the back of your phone. Keep that in mind!

This is my favorite example of a bad selfie (is there really such a thing with cute kids though??). We had a good laugh at this. 

selfie

6. Lighting is key to get sharper images on your iPhone. If you try to photograph your kids chasing each other in your dark living room, you might get one or two that work okay, but 90% of them will be blurry. The brighter your scene is, the easier it will be for your camera to snap a clear shot of a moving subject. Wait for the morning sun to shine through, head outside or stay near nice window light. The brighter, the better.

iPhonetips3.jpg

7. Hold your shutter button down for burst mode (iPhones 5s and above)! This is a fun feature that will take photo after photo (10 frames per second) to freeze motion. You can then review the photos and save your favorite one. Don't forget to delete the rest, they will quickly fill up storage space on your phone. I shot this whole sequence in burst mode and picked this as the best one. 

Tips for Taking Better iPhone Photos

Burst mode and shooting panorama photos (iPhone 4s and higher) are newer features and can be really fun. Give it a try. I love shooting panorama landscapes with my iPhone. It's so quick and easy.

iPhone Tips and Panorama Photos
Take Better iPhone Photos!
iPhone Photo Tips and Panorama Photos

8. Your camera has a built in grid that can help you with better composition, or practicing the 'rule-of-thirds' (we'll cover more about this term later). To turn this on go to Settings - Photos & Camera - Grid (slide it to on). It will bring up a grid like this image on the right shows, so you can practice composing your subject along these lines of interest or intersections. 

iPhone Rule of Thirds Grid

Remember that phone cameras over the last three to four years have improved drastically. I am amazed at the quality of the camera on the newest iPhones, compared to even the iPhone 4. Don't stress about having latest and greatest! It just might take a little more strategy to get crisp, clear photos and don't feel bad if you don't own a bigger, nicer camera. Take advantage of how great the camera on your iPhone can be and stay tuned for more iPhone tips and tutorials on mommatography.com! 

 
better iphone photos