Feature Friday - Andy Earl

My name is Andy Earl and I grew up here in the Wasatch. I work for Goal Zero managing content, social media, in-house photo and creative writing. I have been there about two years. My parents got us into skiing at a young age which started me on the path towards a bit of an obsession with the mountains. I met my wife, Neena, on the chairlift at Park City and we have been married for about five years. We had a little girl named Indira two years ago who was stillborn at full term and we now have an 8 month old little boy named Coen. 

1. What led you to pursue photography? 

I have always been into documenting things. It started with making snowboard videos in high school and then eventually led me to a degree in journalism. Photography was a way to support my writing but now it is kind of the other way around. I actually stole my wife's camera while we were dating and that kind of spurred all things photo for me. 

Friday Feature - Andy Earl - www.mommatography.com

2. What camera are you shooting with, and do you have a favorite lens?

I shoot a lot with the Canon 5D mark III and the 7D mark II. Man... favorite lens depends on what I am shooting. A lot of times, because I am doing long days in the mountains I have to make decisions on weight. Sometimes I can only afford to bring one lens and that usually is the most versatile, which for me is the f/2.8 24-70mm. I have also been really into the 14mm lately though. It is such a fun lens! 

Friday Feature - Andy Earl - www.mommatography.com

3. How do you prepare to shoot in varying outdoor conditions? 

I always have a big lens cloth on hand to deal with moisture, but most of it is just trusting that my camera can handle some snow and rain. So far I haven't had a problem and I have shot in temps as low as -13°F, countless snow storms and a few rainy days. 

Friday Feature - Andy Earl - www.mommatography.com

4. What is your favorite subject to photograph?

I like shooting people who are pushing themselves to do really difficult things in really beautiful places. I think a little suffering in a beautiful place make for an awesome story to tell visually.

Friday Feature - Andy Earl - www.mommatography.com

5. What are a few tips you might have for those wanting to shoot landscapes or outdoor lifestyle shots?

  • If you are on the move, keep your camera super handy. I carry mine in a chest pack typically, so I can capture moments and people as they happen rather than having to stage things. 

  • Be willing to take your equipment to places that other people aren't. A photo becomes more important to you personally when you have a bit of a story, and maybe a little suffering, to go along with it. 

  • Focus on the equipment you have rather than the equipment you don't. Sometimes it is really easy to think about a shot that I could get if I had brought a different lens, or this or that, rather than focusing on nailing the shot and moment I am in. You also never know what the weather is going to do; I had a moment up on Timpanogos last year where the clouds closed in and I thought the opportunity to take photos was over; turns out that the clouds made for some really unique photos. 

Friday Feature - Andy Earl - www.mommatography.com

6. When did you start sketching?  

I have been into drawing my whole life. As a kid I would go through reams of paper and make giant crazy messes. I hadn't picked up a pen in a long time but I got inspired on afternoon to pick it back up. I kind of drew inspiration from a few artists like Renan Ozturk, Jim Harris and Jeremy Collins. I haven't really stopped drawing since. 

Friday Feature - Andy Earl - www.mommatography.com

To see more of Andy's work, follow him on Instagram at @wasatchandy. His sketches are available for purchase at his website, Andy Earl Creative


Shooting in Raw vs. JPEG

Now that you have your DSLR and you've been learning different settings like aperture and shutter speed, it's time to think about files and formats! Have you ever heard of shooting in RAW and wondered what it really means? Are you crazy frustrated at how BIG these files are and that they take up so much room on your computer? Let's figure out what the heck RAW means, when to use this file size and how it's different from a regular good ol' JPEG file. 

JPEG FILES

A JPEG file is a standard format that is processed right inside your camera. Every camera processes these files differently. In a nutshell, your camera automatically adds a few edits such as brightness, sharpening, blacks and contrast to a photo. It will then compress the information, making it a smaller file size. These compressed JPEG files can be viewed and printed right away by any photo program on the market. It's important to note that JPEG files discard some of the image information and detail, which cannot be brought back.

This leads us to a term called DYNAMIC RANGE. This term describes the range of the shadows and the highlights in an image, or the darkest and brightest areas.  JPEG files don't have the full range of detail in those areas like RAW files do.

RAW FILES

A RAW file is is a file format that is complete or lossless, containing all of the data that comes from the camera's sensor. It is NOT processed, so the files usually look a little darker and flat. RAW files have to be processed and viewed using the software that came with your camera, or another popular program such as Adobe Photoshop, Lightroom, Aperture, etc. before having a photo ready to be displayed or printed. Raw files have a higher dynamic range (more detail in the highlights and shadows). A RAW file will save as .NEF on a Nikon camera and with a Canon camera, the file will be .CRW or .CR2. 

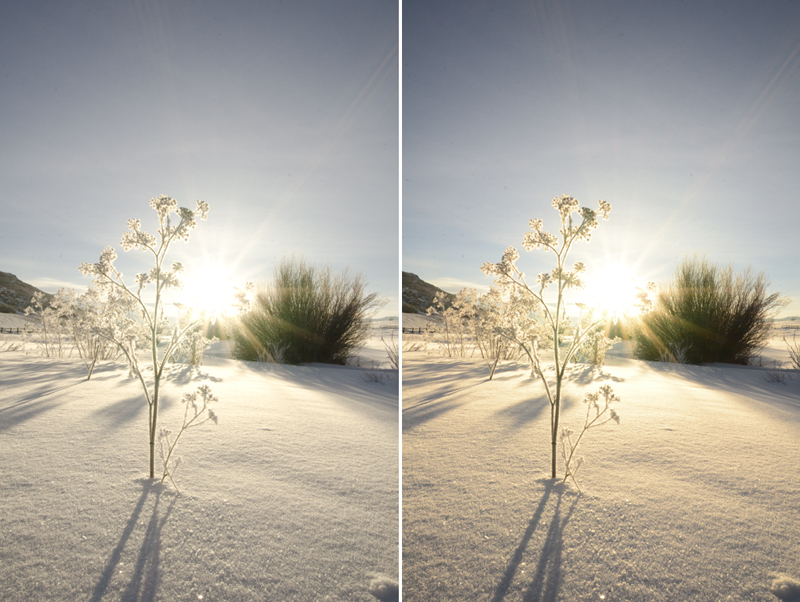
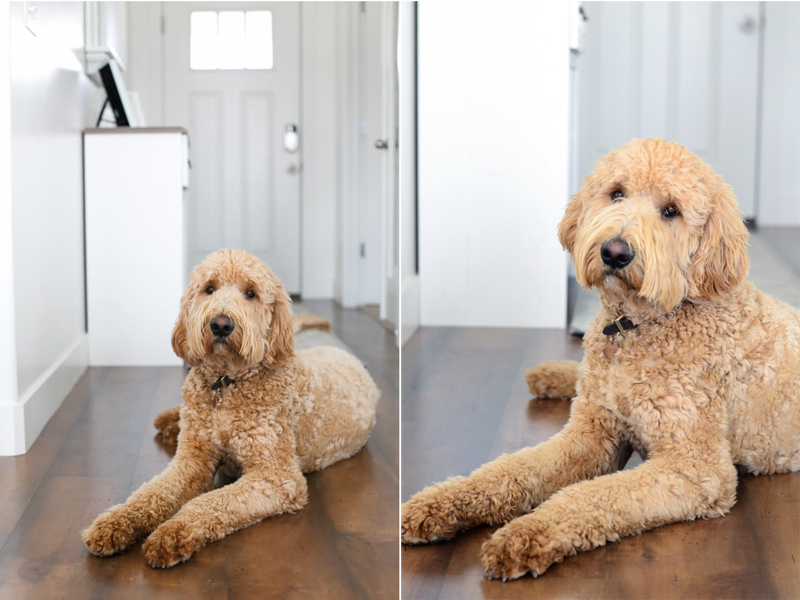
Here's a quick example of an image with a RAW file (left) and the JPEG file (right). You'll notice the JPEG photo on the right has more contrast, blacks and brightness added to it. These are untouched so you can see the difference between a RAW and a JPEG file, straight out of the camera. 

Raw vs. Jpeg example - www.mommatography.com

When should we shoot in RAW and when should we shoot in JPEG? 

Both file formats have their uses; I don't think it's smart to shoot either one ALL of the time. Oftentimes you will hear that it is better to shoot in RAW. That is true most of the time because a RAW file will always have more information, giving you more to work with in post-processing. Here are my suggestions about shooting in RAW vs. JPEG: 

  • I would recommend shooting in RAW when you are in a situation where factors are constantly changing, requiring you to shoot quickly. For example, if you are taking photos outside and the sun is in and out of the clouds, constantly changing the lighting in your scene, it's easy to make a mistake with your settings and getting a poor exposure (a photo that is too bright or too dark). If you are shooting journalistic photos, weddings, or events, shooting in RAW will give room for error just incase your photo isn't the perfect exposure. This is very helpful for any event that might be significant (for instance, anything involving a BRIDE or your babies first cake smash; things you can't go back and redo). If you under pressure, trying to capture the perfect moment, shoot in RAW! If a JPEG photo is too bright, you can't darken those areas to see more detail. It will be BLOWN OUT and the information is gone. 

  • I always shoot in RAW when I am shooting landscapes because an entire landscape scene has a high dynamic range of highlights and shadows. I might want to brighten up the shadowed areas or decrease the brightness of my highlights to get a great print. 

  • If you need to view photos immediately after shooting, shoot in JPEG or RAW + JPEG. It's pretty obvious, but RAW + JPEG will give you both the RAW and the JPEG files; this way you have the RAW file for editing, and the JPEG for viewing right away. 

  • It is important to remember that RAW files are MUCH larger in size than JPEGS. This means they will fill up space; so plan accordingly and be sure you have space on your hard drive or get an external one in order to store your files. If I am shooting a landscape to edit, print and frame at a large scale, RAW is a no-brainer for me. If I'm shooting a weekend BBQ with family and friends, I'll shoot JPEG.

Think about your situation and shoot in the format that makes sense so you're not stuck with large files that need processing! Also make sure you figure out if the photos are important enough to you to shoot in RAW just in case you mess up the exposure. With RAW files you can bring back some of that information and save the photo. We'll cover more details about software for processing RAW files soon!


Creating Black and White iPhone Images

It's time for another fun iPhone post! We've been learning a lot about DSLR tips so I figured we should make things simple and fun and switch back to iPhone photography. It is spring break after all! It is almost 70 degrees here; we are loving the warm sunshine. Bring on springtime. Bring on better iPhone photos.

If you're looking for another way to improve your iPhone photography, today's tips will help you create great black and white images with your iPhone. Once in a while I'll take a photo that is too harsh from really bright sunshine, and I won't like the way it makes the colors look. Or I'll want a photo to look a little more timeless or less distracting by having too many colors in my scene. This is where black and white comes to the rescue! It can often save a photo from being just... BLAH and make it more interesting by converting it to a black and white photo. Let's see how we can get this to happen. 

I made a quick video of how I like to convert my images to black and white JUST using my iPhone photo editor. This is quick and easy! First I'll show you a method starting with a preset B&W filter, and then a second method doing it from scratch.

Here's the before and after of this photo. I shot this in mid-day sun; I like converting images that are shot in harsh lighting conditions to black and white.

Converting iPhone Photos to Black and White - www.mommatography.com

Here's a perfect example of an image that looked kind of boring and the colors were yucky, but in black and white it looks much better. The contrast from my subject and the bright window behind him makes it much more interesting. 

Converting iPhone Photos to Black and White - www.mommatography.com

Sometimes I like the extreme contrast that the preset filters provide, but sometimes it can be too much. It all depends on the photo. Play around and see what you like! 


Restoring Old Photos

Last week was an emotional week, as I received the news that my Nana passed away. She was such a great example to me of living with meekness, kindness and love. Her life was very simple and humble; they lived on a small ranch in the Arizona mountains, a place that became so dear to me over the years. I will miss hearing her sweet voice and seeing her lovely smile.

As I sorted through photos of the many trips we took, literally over the river and through the woods to get to their home, I found this image I've always loved of her. This was a 4x6 photo that lived in a small frame upstairs in a guest room that had only one small window for natural light.

Restoring Old Photos - Picture of a Picture - www.mommatography.com

I took a picture of it with my old DSLR, wanting to keep it for myself. This got me thinking about how easy it is to save old photos, not only by scanning them, but by taking a picture of them. I have done this a few times at my grandparent's homes. It's not easy to find access to a scanner and who wants to take the time to sit and scan photo after photo? All you need is a camera!

With a little editing, these old photos can be brought to life. This my before and after: 

Trick to Restoring Old Photos - www.mommatography.com

I used photoshop to do this, since I had some areas that had finger smudges on the frame and writing on the bottom of the photograph. We will cover A LOT of editing tips in posts to come. I will show you step-by-step instructions of editing photos. For starters, you could import this into any editing program you use, and by adding some brightness and contrast, make it look much better. 

For now, when you are somewhere that has special photographs that you want to keep, take pictures of them and save them for your own family history. A picture of a picture totally works; you can get them printed out to look just as good. This one is priceless to me and now I can show my children what their Nana looked like; someone who was so wonderful, sweet, caring and kind, and who I will always look up to as I raise my own kids. 

Restoring Old Photos - www.mommatography.com

We love you Nana!


Full-Frame and Crop Sensor Cameras - Understanding Lenses

Now that we've covered full-frame vs. crop sensor cameras, how do lenses collaborate with these types of cameras? Can we use any Nikon lens on any Nikon camera? Not exactly. I'll tell you why!

With a Canon camera, EFS is the term for a crop sensor lens and EF is the term for a full-frame sensor lens. With Canon, full-frame EF lenses can work on crop sensor cameras, but a crop sensor EFS lens doesn't work on full-frame cameras. 

Nikon's lenses for crop sensor cameras are called EF-S and the full-frame lenses are called FX. With Nikon, you can also use FX lenses on crop sensor camera bodies; however, if you mount an EF-S lens on a full-frame camera body, the edges of your image will be dark (vignetting). The image circle of the crop lens isn't big enough to record the image on the sensor and get the full photo; you'll get dark vignetting if you take a photo with a crop lens on a full-frame camera. The example below shows what the circle of view might look like through a full-frame lens. 

Full Frame Sensor vs. Crop Sensor - Working With Lenses - www.mommatography.com

Canon's crop lenses won't even mount on to a full frame sensor camera. Nikon's crop lenses will mount on a full-frame camera body just fine, but the functionality is basically toast because of the dark vignetting that will show in your image. You can get an idea of what this looks like in my example below; the circle-of-view on a crop lens is smaller.  

Full Frame Sensor vs. Crop Sensor - Working With Lenses - www.mommatography.com

Another thing to consider if you go with a crop sensor camera is the focal length of your lens. A crop sensor changes the focal length of your lens because it changes your field of view. To find your true focal length, you can use a focal length multiplier.

Nikon lenses have a crop factor of 1.5x. Canon's crop factor is 1.6x. To find the focal length, use the focal length of your lens and multiply it by your crop factor. 

Here are a few examples of how to calculate the actual focal length of your crop lens!

  • A Nikon 50mm lens would really be 75mm (50 x 1.5 = 75). 

  • A Canon 50mm lens would really be 80mm (50 x 1.6 = 80). 

So your 50mm lens would have a longer focal length, bringing you much closer to your subject because it acts like a 75mm lens. With crop sensors, you basically get free zoom :)

I will include my same example from the previous post to illustrate how focal length varies between a full-frame and crop-sensor camera. The image on the left was taken with a full frame camera; the image on the right was a crop sensor camera. The images were taken from the same spot with a 50mm lens.

Full Frame Sensor vs. Crop Sensor - Working With Lenses - www.mommatography.com

When it comes to lens selection, remember that on a crop sensor camera, your lens will be longer than it seems.

Don't get too worried about the full-frame vs. crop sensor camera dilemma if you're just starting out and budget is an issue. I've used crop sensor cameras for years; they are still fantastic cameras, especially when paired with a good lens. 

It is smart though, to think about which lenses you'd prefer to invest in; if you can spend a little more for the full-frame lenses it will benefit you greatly if you decide to upgrade to a full-frame camera in the future!