


Tips for Better Blog Photos & DIY Projects - DIY Wooden Planter Tutorial
It's time for a fun Friday post! Today I have some tips about making DIY project photos a little more interesting... and an actual DIY tutorial on making this pretty little rustic wooden planter box. I have a secret dream of one day having my own wood shop so I can make anything I want. I'm no professional when it comes to woodworking but I had a lot of fun making this box, it was super affordable and so easy to make!

SUPPLY LIST:
hammer
finish nails (mine were 1.5 inches long)
pine (two 1x6 boards - I had mine cut at home depot so the dimensions of my box were 2.5 feet long and the short sides are 8" long. I recommend having the bottom piece cut, any wood you can find that will give you just shy of 8" wide by 28". My box fit together having a bottom of 28 and 15/16ths" x 7 and 15/16ths :) I used a piece of plywood I had in my garage.
sandpaper
old cloths
wood stain (I used Rustoleum's dark walnut)
gloves are helpful to avoid staining your fingers :)
optional: wood glue
You can make the box any size you want; this one is for a table that seats eight! Just be sure to get your measurements right!
Here's my first tip for DIY photos.
PHOTO TIP: If you have a bunch of supplies, try different layouts of them all and pick which photo you like best. As you can see in my example below, I started with an idea and didn't like the composition. AT ALL! After rearranging and a little bit of trial and error I liked photo #4 the best. It seemed more interesting and there's no distracting background. I already list the supplies so I like this shallow depth of field that blurs some of the supplies. Try to think a little outside the box. Compose and recompose.

STEP ONE
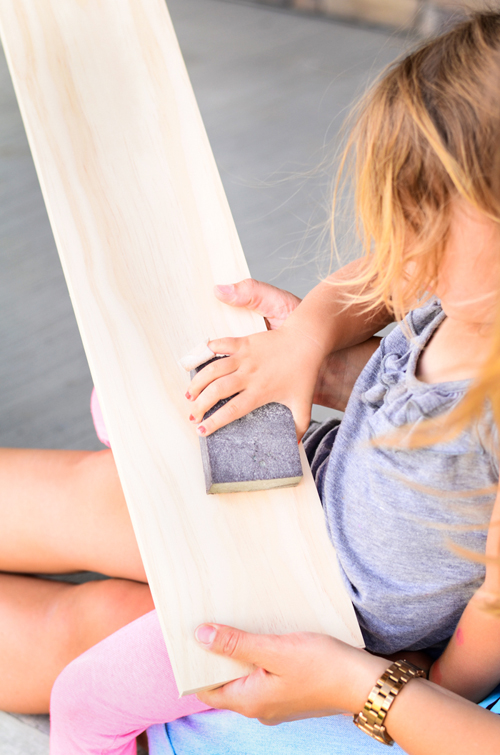
Sand your wood! I used a sanding block and 150 grit sand paper to sand all the edges and get my wood smooth. I like to sand the edges a little harder so they round off a bit. Also, be sure to sand WITH the grain of the wood so you don't get scratches.

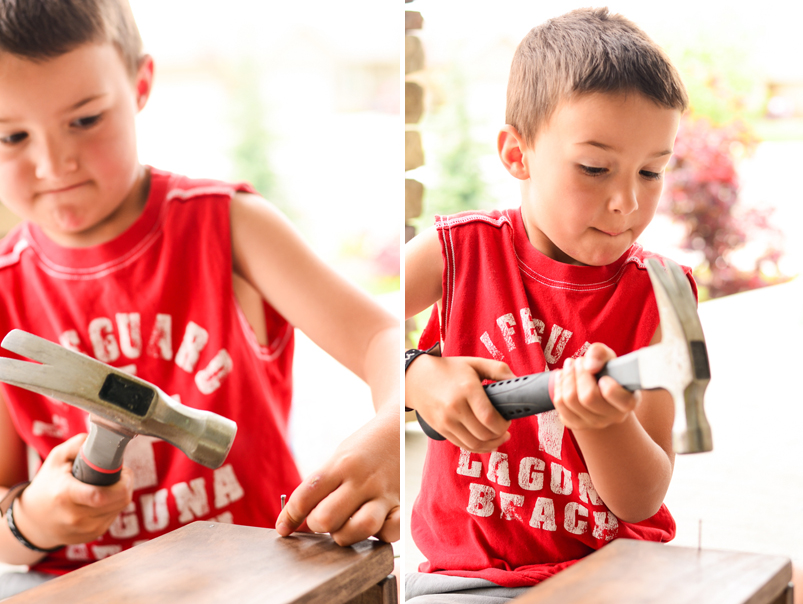
PHOTO TIP: I had a lot of fun adding my kids into the mix! They wanted to be a part of the process, so I let them. If you have children, it helps a lot to have them take the photos or hold things for you. Plus, it makes them happy and it's a fun project to do together. They loved helping me sand the wood and how cute are those little hands? These kiddos added a fun lifestyle element to my photos.
STEP TWO
Take a slightly damp cloth and wipe down your boards so there's no dust from sanding left.
STEP THREE
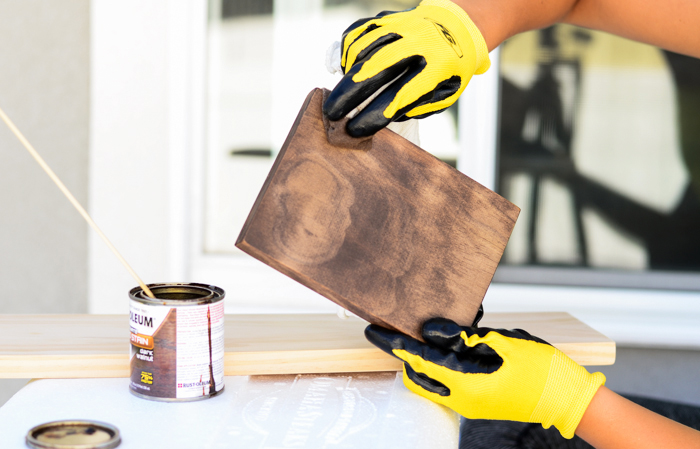
Stir your stain well, grab an old rag and dip it in the stain (I didn't let them help me with this part, for obvious reasons :)
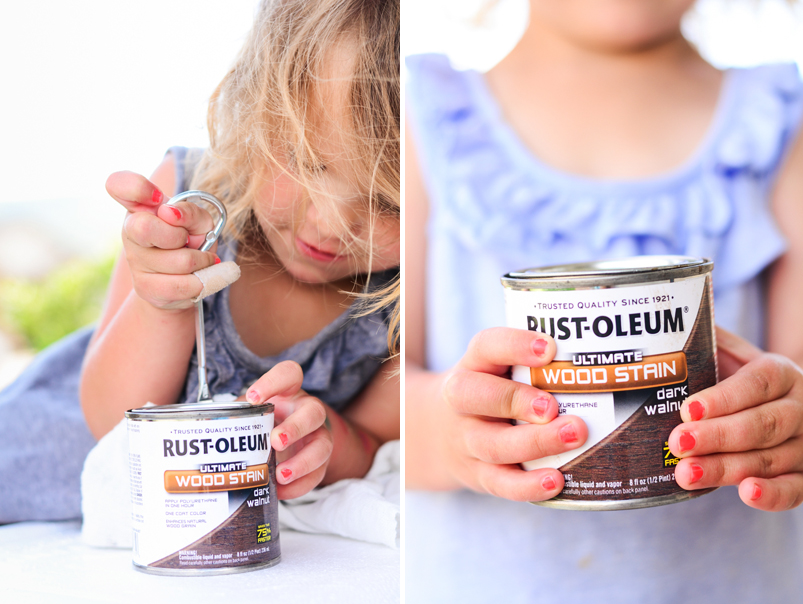
Rub the stain on the surface of the wood (I also did this with the grain of the wood) until you cover all surfaces.

The thicker you coat it on and the longer you leave it on, the darker your stain will be. I didn't go crazy with mine; the dark walnut stained the pine really well with one coat. Set out to dry. It took about 20 minutes outside on a warm day for my stain to dry well enough.
STEP FOUR
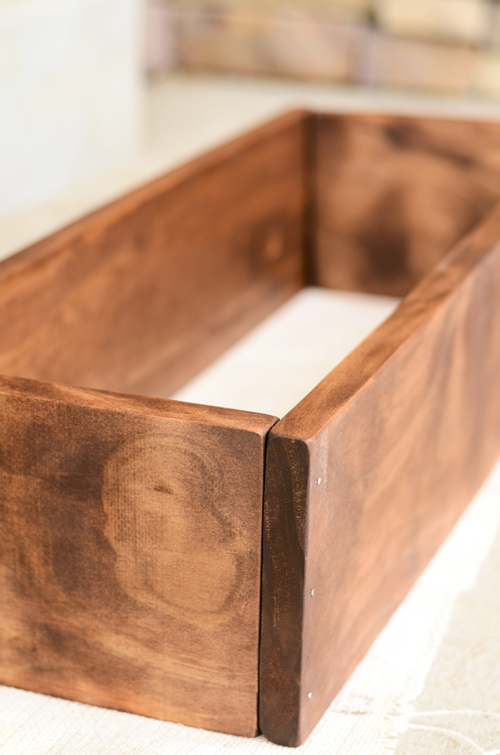
Time to put it together! If you want to use wood glue and nails, lace the edge of your box with wood glue before hammering your nails in. I just used finish nails. Place the boards so the edges are flush, like the photo below on the left. I just eyeballed and nailed three nails across the sides to attach the sides together.
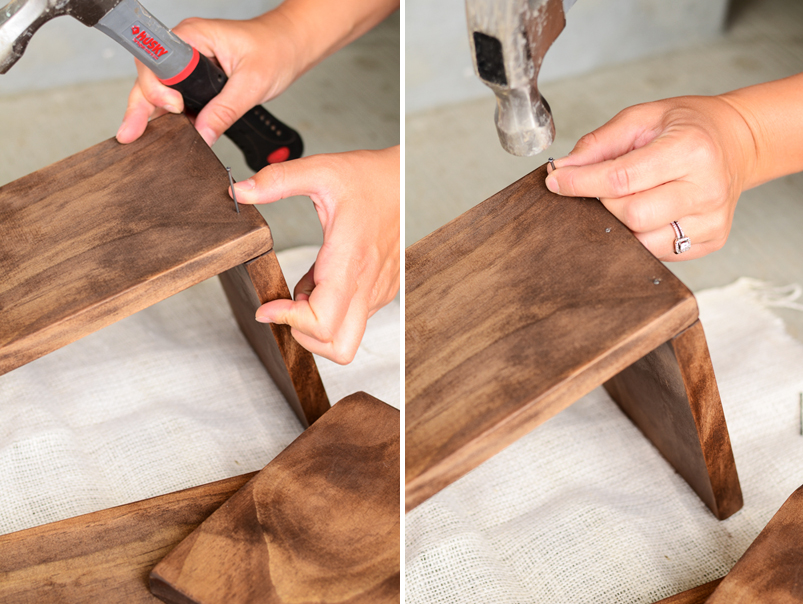
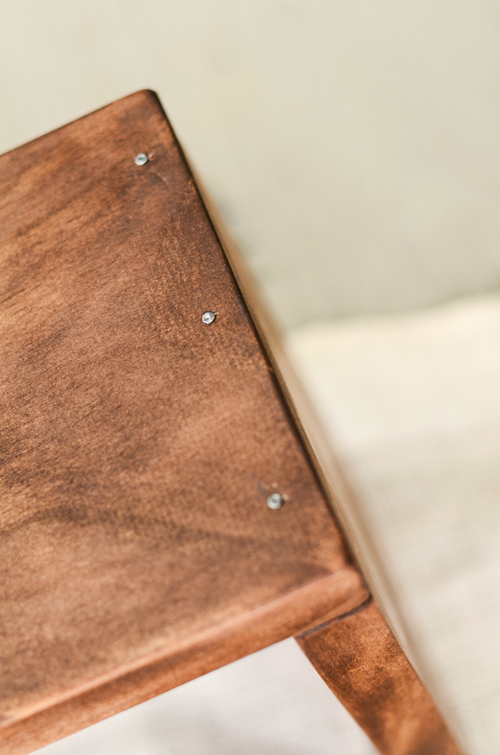
PHOTO TIP: LIGHTING! Lighting is key to getting blog photos that appeal to others. Make sure you are shooting your products, food or portraits, whatever it may be, in a well-lit place. Have a goal in mind for the lighting you want to go for, and find the best place in or around your house to achieve it! I like the lighting on my front porch. We used that for most of these photos. Garages (with the door open) can make for an awesome natural-lit studio. Bright, clear images will go a long way.
PS: I used my 50mm f/1.8 lens so I could have a shallow depth of field and bright images. Most of these images were shot on either f/2.8 or f/3.2.


STEP FIVE
Once two ends are nailed together, place the last long side on top to hammer it on. It's easy to bend the finish nails, so I braced them with my thumb to make sure they went in straight. The last thing you want is a nail to come through the side because it was hammered in crooked. I'm speaking from experience here!
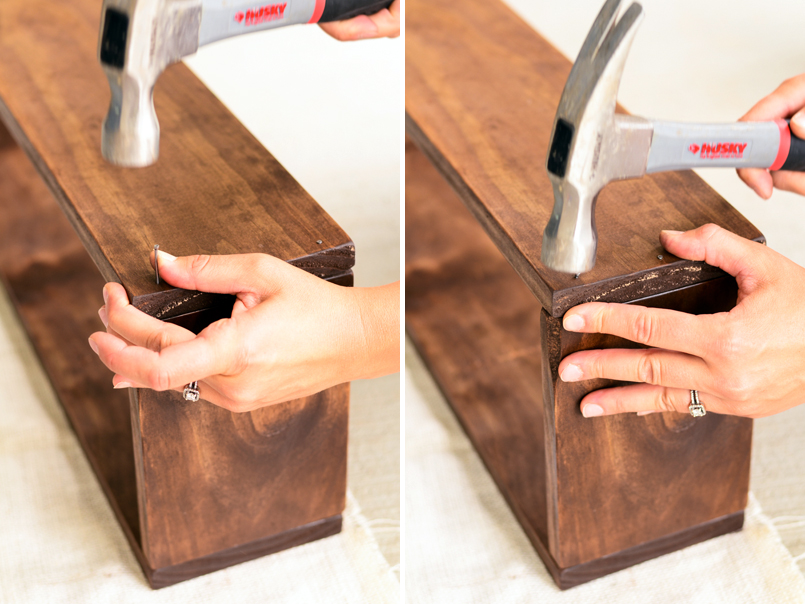
PHOTO TIP: Sometimes shooting a DIY project is SO hard because you might be the only adult around. If you don't have an assistant, use a tripod and a timer to try and get your shot. For the images above, I had my photo composed how I wanted it and had my son snap the shutter while I hammered. Having an extra set of hands helps a lot, and a tripod is really handy as well.
This guy loved being able to use real tools! I think we'll be doing projects like this more often!
I placed my box on top of my extra wood to trace the inside and used a hand saw to cut my plywood for the bottom of the box.
STEP SIX
Hammer (or glue and hammer) three nails on all four side of the bottom of the box to attach the bottom to the sides of the box.
Ta-DA!! You have your finished box! You can place mason jars with flowers inside, or go a few steps further and make it into a planter.

I made two of these lovely little boxes. This tutorial is a box for me and the box below I made as a gift; I left space for two more succulents to be planted. I just shot this with my iPhone before giving it away but wanted to show you what it looks like if you want to make it an actual planter box.
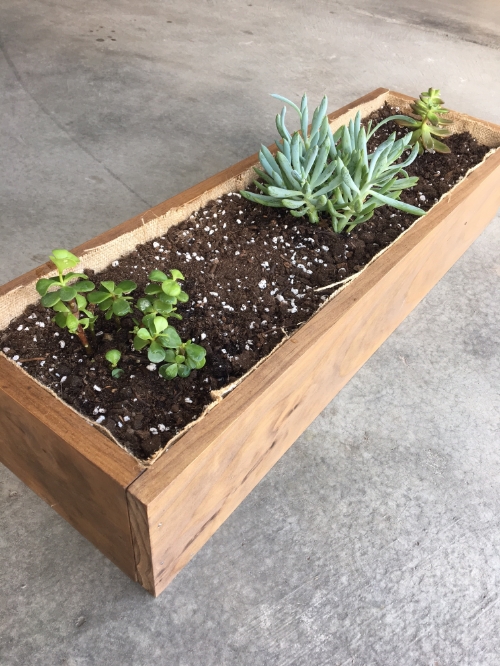

To make a planter for succulents, like I did, I lined the inside of the box with plastic (to waterproof it). I then filled the bottom with packing peanuts, topped with soil and planted my succulents. The packing peanuts will help the water drain better, since I don't have holes in the bottom and don't want the water to deteriorate my wood. I also lined the inside edges with burlap using more wood glue. You can paint and distress your box however you'd like to if you want a different look!
I loved this project! I hope it's easy to follow and your boxes turn out as great as mine did. I'm pretty excited about them. It really didn't take me too long, and I'm pretty sure I spent less than $20 on each box.
Remember to take your time and really get your blog images where you want them to be; don't rush the process! The quality of your photos make a HUGE impact. Cheers to better images and fun summer projects!
Printable Photography Cheat Sheet
Let's take a break from editing tips and get back to some basics! Today I made a really convenient printable photography cheat sheet for those wanting a little guide that can fit inside your camera bag! This is a 3x5 card that you can carry and refer to easily on the go. When you want to know what settings to use in certain situations, just snag your card to help you remember what all those crazy settings will do to your image. It can be easy!
Keep practicing shooting manual, or choose your aperture priority to practice selecting your own aperture. That's always a good place to start; you only have to think about half of the equation because your camera will choose your shutter speed for you!
Click here for the full 3x5 file.

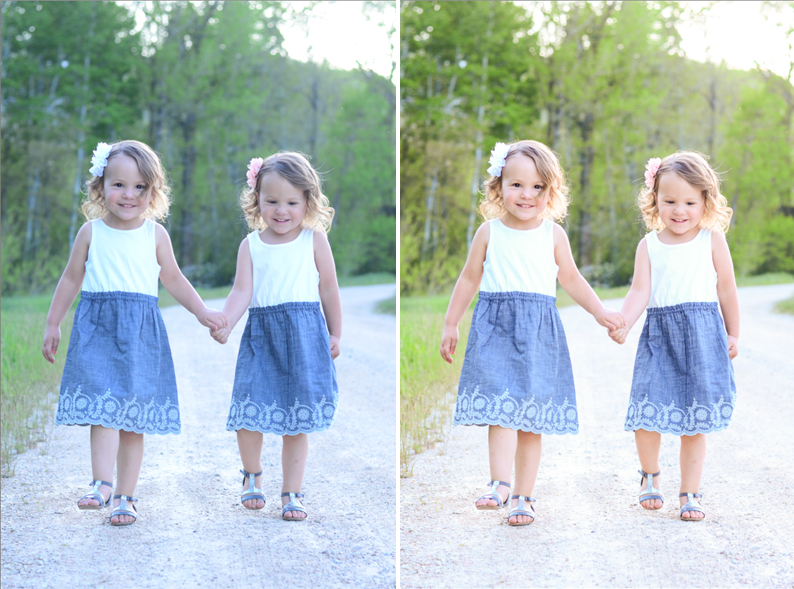
Simple Editing in Lightroom - Video Tutorial
Check out my quick video walk-through of how I edited this portrait! It doesn't take much to make your photos pop. Learn how to get this look in Lightroom by following my easy tutorial!
Here's the Video Tutorial:
How to Import Photos Into Lightroom - Staying Organized
I can't believe it's June 1st! I love the month of June; it means summer is here, my birthday is coming up and it's time for a lot of baseball and barbecues. This also means MORE photos of everyday life. How can we keep track of and organize thousands of photos? Lightroom!
I've realized that by teaching about Lightroom, I myself need to get even more organized with my photo library! If you haven't read my first post about a quick intro to Lightroom, read it first. In Lightroom, it is important to get a good system going right from the import. I made a quick video walk through for you to understand your options when importing photos in Lightroom. This tutorial will help you to add keywords to find photos easily in the future. It will also help you name your files and establish a good system to make your life easier when it comes to organizing your photos!
Check it out!
For some reason part of my window got trimmed, so I hope you can follow along okay! The most important things to remember when importing are:
Rename your files so they are easy to understand and find.
Select the destination folder on your hard drive where you want to store your photos (I don't do it by date. Trying to remember what I shot in April of 2015 isn't convenient for me. I like to name my folders by event). Under organize, I choose 'into one folder' as you can see below. If you prefer to have your folders labeled by date, you can choose 'by date' instead.

Add keywords to your images to help you find them in the future.