Introduction to Lightroom - Learn Lightroom the Easy Way!

If you have recently purchased Adobe Lightroom, congratulations! I promise you will absolutely LOVE this editing program. I seriously do and I use it almost every day. Lightroom simplifies editing. It's so easy and actually enjoyable. PLUS it is a great way to stay organized so you don't make a mess of your hard drive with hundreds or thousands of photos. Let's jump in and get familiar with the basics today!

To start it off, Lightroom works in different 'modules'. These are different screens designed for different tasks; luckily, you really only need to know two of them. These are your Library and Develop modules. In the Library module you can import and organize your photos. Simply choose the location of the images you'd like to find, and click import. Here's a peek at this window:

The awesome thing about Lightroom is that it actually saves all of your edits in different catalogues on your hard drive. This doesn't take up nearly as much room as for example, psd (photoshop) files. You can also revert to the original image at ANY time; you'll never lose your original file! I love this feature. 

In your Library you can set up collections, folders and use keywords to help you sort and rearrange your photos. This might seem a little dull but this module will save you when you want to find photos down the road, and have a system set up to easily find what you're looking for! 

Once you have your photos imported, you can select one and click on the Develop module, right next to the Library tab at the top. This is the fun part! The Develop module is your darkroom, where you can make all the edits and be creative with your photos. You can also label your photos, making it easy to sort and edit only the best photos from any shoot. 

Here's a quick breakdown of the tools you have on your right-hand toolbar. You'll see the histogram for your image, which will show you your light and dark values. Mine are mostly to the right, because my subject is pretty bright and I let the background be over-exposed. I like this look for back-lit subjects. 

Below the histogram you'll see your crop tool, a spot removal tool (to fix blemishes or remove things from your photo), a red eye tool, your graduated filter tool, and your local adjustment brush. This brush is useful to brighten/darken certain areas of your image, among other adjustments to specific areas! I use this often to brighten up faces. 

Here's a quick breakdown of your basic toolbar. You can change your image to black and white, adjust your white balance, exposure, contrast, saturation, etc. 

Here is a quick example of some edits I did for the photo example below. I began by increasing my exposure to make it brighter (sliding the slider to the right), adding contrast to make it pop, changed the white balance by increasing the temperature to warm it up and added a little clarity and vibrance. I always start by getting the exposure where I want it, add contrast, fine tune the highlights and shadow areas, then adjust the white balance to get the light the right temperature. I shot this in the evening, which is a colder, bluer light if shot on an auto-white balance setting. I usually shoot on my kelvin white balance setting, so I can get the photo warmer in camera. I definitely wanted to warm it up and Lightroom makes it so easy to change little by little until you get it just right. 

Here's the before and after:

I hope this quick walk through helps you on your road to understanding how Lightroom works. This is just a quick intro; there's a lot more to come, such as my favorite feature of syncing edits to multiple photos all at once, along with organizing tips to keep your photo storage under control!

I will also do a video walk throughs on how I edit specific photos so you can see exactly how I adjust my images to get them to look great! Play around with your tools and you'll find that Lightroom allows you to make simple edits that can drastically improve your photos! 


Friday Feature - Pretty Providence

Today's Friday Feature highlights the first of many creative mom-bloggers! A portion of mommatography's audience include bloggers that search for tips to take better photos. I'm really excited to feature mom's that have successful blogs, along with highlighting photographers and other artists. 

The lovely ladies over at Pretty Providence have got it going on. From beautiful DIY projects, fashion sense that doesn't break the bank, to delicious drinks and recipes, Pretty Providence is a great source to keep things fresh, frugal and fun. Let's get to know them and hear a few great tips to become a better blogger!


Hey friends! I am Jessica, half of the creative team behind www.prettyprovidence.com! I started Pretty Providence a little over four years ago with my good friend Sarah, because we wanted a place to share our thoughts and ideas with other like-minded people! We believe that you can still look good, eat well, have a great home and play a ton while living on a budget. We love sharing frugal recipes and DIY's and we are very blessed to be able to work from home and help provide for our families while doing what we love!

What are some tips for those pursuing blogging?

Blogging can be interesting in that it becomes easier to make money the longer you do it. The more quality content you have to promote and share, the more money you make and the less time you have to spend generating content (but don't worry, tons of new ideas creep up to fill all of your time)!

  • My tips for anyone starting out blogging are always the same: Put out great content on a consistent schedule, even if you think no one is reading.


  • Strive for bright, clear, photos.


  • Learn from and network with those who are succeeding around you.


  • Go to a class or conference, never stop trying to hone your skills. If you want to make money, you need to treat it like a real job.. aka: work, work, work.

We hope you'll stop by and say hello, we love new friends!

To see more great ideas, follow Pretty Providence on Instagram at @prettyprovidenceblog on Pinterest, and here on Facebook!


Happy Birthday to my Girls - Portraits of Twins

My sweet little twin girls turned THREE today! I can hardly believe how fast they are growing up. It seemed like yesterday they were still in the NICU; all five-and-a-half pounds of them, connected to feeding tubes and oxygen help surrounded by nurses. We made it to three girls! You can stop growing up now.  

Sometimes the phases that toddlers go through (fighting over toys, throwing fits, biting, having accidents, spilling drinks, having no interest in eating, getting out of bed five times a night, refusing to nap and falling apart before dinner... you know that kind of thing) can make for difficult days and long nights... now times that by TWO and it can turn into quite the circus act! I can honestly say that I wouldn't trade any of it for the world. Those moments are small and quickly forgotten amidst the joy, giggles, snuggles, love and pure happiness we experience together. I love these two little angels with all of my heart and am so blessed to have them call me Momma! 

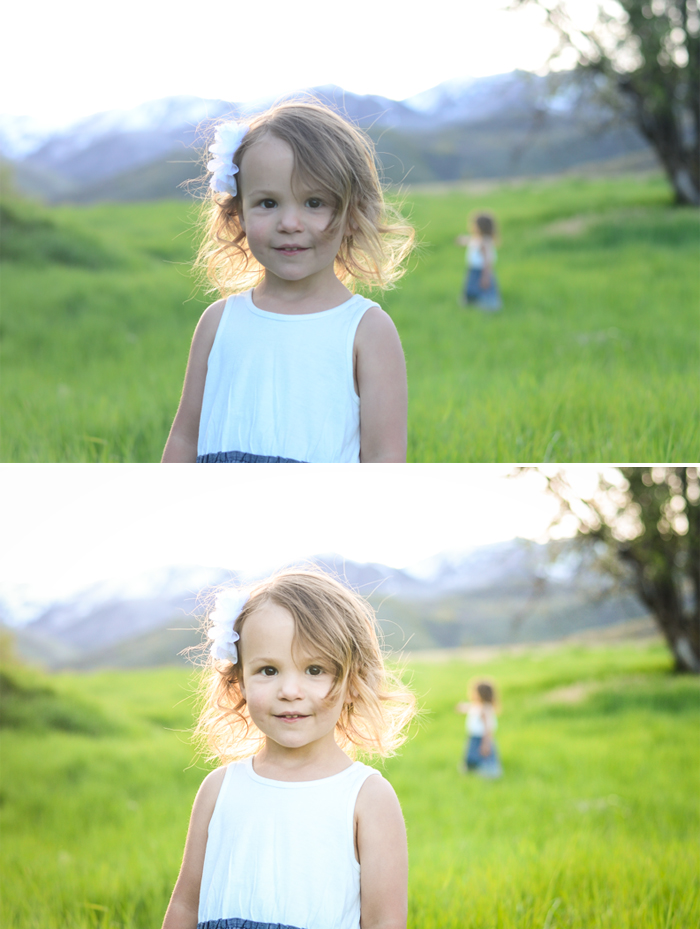
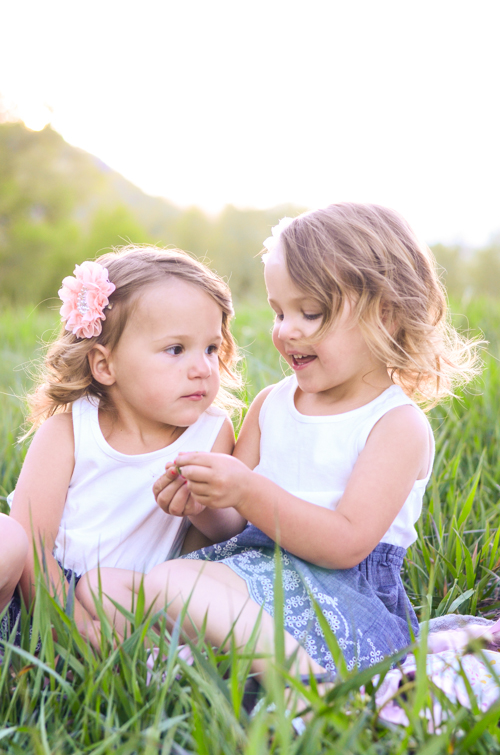
SO, as a tribute to them, today's post is entirely that; my latest portrait session with these two, taken a few nights ago at sundown. They laughed, cried, and toughed it out, walking through pokey fields with just sandals on and not having had much of a dinner. It went ten times better than I thought it would (I made them leave their best friends' birthday party early to catch the good light - dinner consisted of half a piece of pizza, sugar cookies and few bites of cake). Thanks for letting me capture the essence of who you are and just how much you love each other. These photos mean the world to me. 

Happy birthday girlies!  

Love you M & E .


Understanding the Difference Between Lightroom and Photoshop

Last month we discussed some free photo-editing software and tools to get you started in the editing realm of photography. Today, I am going to build off of that to answer a question I hear every-so-often: What is the difference between Lightroom and Photoshop? Both of these programs are used widely by photographers; they have many similar editing tools but are also very different from each other. If you are gung-ho about doing some post-processing to your images and want a great software program, this post will give you a general, simple way to understand the tools both Lightroom and Photoshop have to offer, the differences between the two, and which one is right for you.

First, let's get right to the point and talk about the cost of these programs.

COST

Lightroom by itself costs about $150.00. To purchase or read more about Lightroom, check it out here. You can also buy Lightroom on Amazon for $142.00. The previous version of Photoshop (CS6) costs at least four times as much as that. Adobe does offer a new Creative Cloud program that will let you have both Lightroom and Photoshop for $9.99/month. This is great for businesses and individuals who use both programs a lot. It can be beneficial for you as well if you want to try them out and see how you like the programs. If you don't want to subscribe to use the software, you can still purchase Lightroom on it's own, or buy the cheaper and more simplified version of Photoshop, Photoshop Elements ($99.99 or $79.99 if you upgrade an older version).

Elements is similar to the full version of Photoshop, but not quite as powerful. It does offer the basic editing tools and is good for beginning-intermediate editing purposes. 

SO! If you want more editing options than basic free software programs but don't want to pay a ton of money, I would suggest going that route; either Lightroom or Photoshop Elements. 

SIMILARITIES 

Both programs handle multiple types of files, such as JPEG, PNG, TIFF, RAW and more. They both offer editing tools such as changing the crop, adjusting your exposure, contrast, and saturation, to working with brushes and curves. You can also go back in your history to review and change your editing as you go. 

DIFFERENCES

One of the key differences is that Lightroom allows you to edit non-destructively, meaning your original image will always be there. You can reverse your editing steps and/or save different versions of any photo without ever losing your original photo. You can always go back and start over with the un-edited version because Lightroom saves the changes you make as you go, in it's own kind of catalogue. This whole catalogue of images doesn't take up nearly as much room as the edits you would make and save on even one Photoshop file. PSD files can be huge! 

Photoshop is geared for those who need to edit very precisely pixel-by-pixel, working with files that have a lot of layers or combining different photographs into one (also called compositing). For example, this image I worked on below needed a lot of hands-on pixel-level spot removing, cloning, and composition of two images into one. For this work, Photoshop was very handy. 

Lightroom provides simple one-click features to speed up the editing process, but also allows for advanced edits. I LOVE how easy it is to make edits to ONE photo, select a whole grouping of images shot in the same lighting/setting, and click 'SYNC' to apply all my edits to those photos at the same time with one click. This is called batch editing. I personally prefer Lightroom's way to do this over Photoshop's batch editing. For me, being a Mom and usually being pressed for time, Lightroom gives me a great way to edit a lot of images quickly. It also helps me keep my images organized. Who doesn't need more of that!? 

Here's a before and after example of an edit in Lightroom.

When it all comes down to it, I think of Lightroom as a FAST & EFFICIENT way to edit photos. Photoshop is more of a drawn-out process with a learning curve, but gives you more CONTROL. See the Photoshop window below; the bottom right corner is where you add layers and masks to make your edits. In Lightroom (the image above) you have sliders on the right hand side that make it a little easier to see your changes and actually know what your changing. 

Photoshop elements is like Photoshop simplified, that allows shooters to use automated options and easy editing tools to jazz up and share photos. Elements has many of the same editing capabilities, but not everything is available. For example, both Photoshop Creative Cloud and Elements allow you to process RAW files in Camera Raw, but elements has limited options. See the example in the toolbar below. 

My greatest advice would be to download the free trials for both Photoshop Elements and Adobe Lightroom. If you need to, watch a few tutorials or just play around with both programs and see which one seems to fit your needs! 


Mother's Day Weekend Giveaway!

What a perfect weekend to start the first giveaway! Be sure to check out my last post on Instagram (@mommatography) or my Facebook page to enter a chance to win a free mentoring session. This includes one-hour of free one-on-one instruction about anything photography related! Ask me for tips about taking better portraits of your kids, everyday photos, lighting, how to understand your camera settings or what gear to invest in... the list goes on and on. It can be anything you want to get you closer to taking better pictures! 

The winner will be announced Monday, May 9th at 9:00 MST. 

Best of luck and have a Happy Mother's Day to all the momma's out there!