How to Take Better Photos With a Samsung Galaxy Phone

I have to admit I am a bit of an iPhone snob, and my 'phoneography' (aka phone photography) articles have definitely been biased towards iPhones! I was curious about Android devices and what they were like, so I borrowed a friends' Samsung Galaxy S4 to see what it could do! Today I have a few tips for taking better photos with an Android device; specifically, the S4. If you don't have the S4, don't stress; I'll have more Android photography tips coming!

  • Learn what mode your camera is set to, and what other modes it has to offer. 

This S4 offers an HDR mode, which means high-dynamic range. If you like images that have saturated colors and a lot of contrast, try shooting in this mode instead of adjusting your settings manually. You can also shoot panoramic images, erase things out of the backgrounds, shoot in sports mode to better freeze motion and more!

  • Shoot using your manual settings!

In some situations, shooting on auto works just fine. You do have the very cool option of choosing manual settings such as your own ISO, selecting your white balance, and using exposure compensation. See my examples below to help you find where to change these settings! 

1. Underneath the camera icon, you can change your ISO. Remember that the higher the number the brighter your photo will be. If it's a dark scene, choose a high ISO number.

2. You can also change your metering modes. Read my article about metering modes to better understand the difference between center-weighted, spot and matrix metering!  

3. Under the settings icon on the right, you can change your white balance, set timers, and use exposure compensation. If you aren't loving your auto white balance, select a certain setting that matches the lighting you are in and see if it helps!

4. If you click 'Exposure Compensation' underneath the White Balance setting, you'll see this slider (image below). Sliding to the left will make your exposure darker, to the right will make it brighter. This is an easy trick to change the exposure quickly!

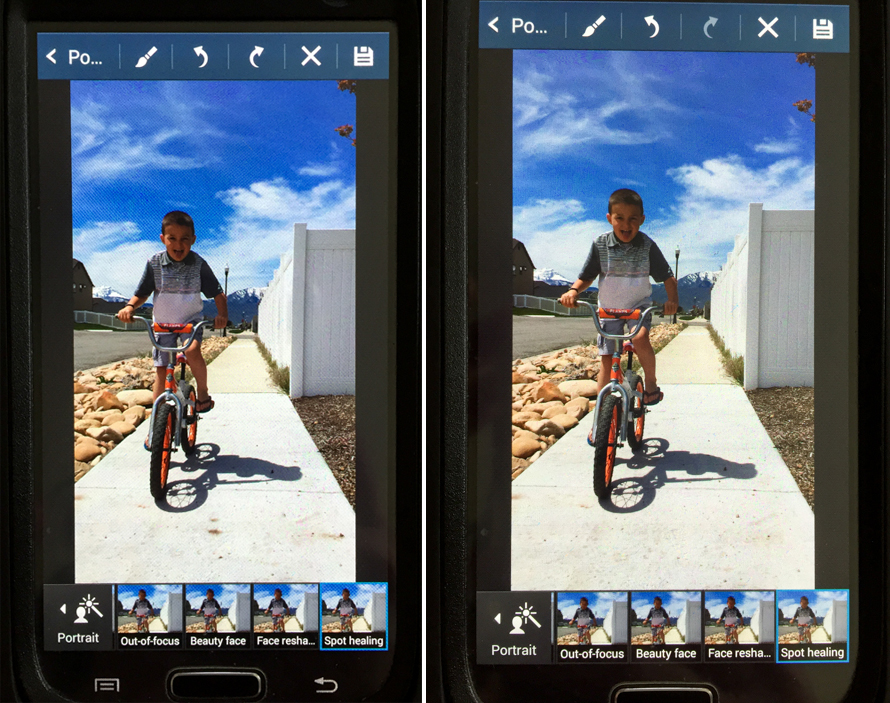
  • You have a built-in spot removal tool! 

Is there something you really don't like in your photo? Simply drag your finger around the object (or photo-bombers face) and this tool will get rid of it! I love that they have this feature. 

Check out the difference between the dirty sidewalk on the left, and after the spot-removal tool was used on the right to clean it up!

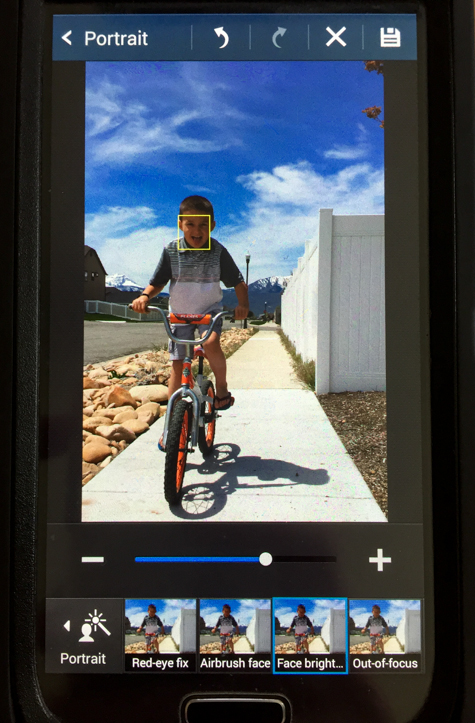
  • Check out your auto-face brighten tool! 

In about 90% of my phone images, my subject's face is darker than I want it to be. I always brighten them up when I can, and this tool is very useful for that. It automatically detects the subjects face and you can selectively brighten just that! You'll find this adjustment under the portrait setting. 

Hopefully some of these quick tips can help you get better results with your Samsung photos! I will have more Android tips in the future, for newer phones and also the best photo-editing apps for Android devices!


Quick Tip - Batch Photo Editing in VSCO Cam

It's Aloha Friday! I spent my teenage years living in Hawaii and every time Friday rolls around, I can't help but say it. We're still getting snow and it's almost May, which is making me miss the warm sunny days on the beautiful island of Maui. I miss that place. Sunshine or no sunshine, I am excited that the weekend is starting! 

Today I've been playing around with the VSCO Cam app and I just learned something AWESOME! I thought I'd share this quick tip with you today.

  • -PS and by the way, the VSCO Cam App is also available on Android phones, not just iPhones. If you haven't dowloaded it already, check it out!

Here's the fun tip: you can BATCH edit your photos on this app! Batch editing means you make your edits to one photo, and you can select as many photos as you'd like to add those same edits to. Click one button and it will automatically apply the same edits, all at once. Pretty sweet, yah? I used to end my sentences with 'yeah' all the time. It's a Hawaii thing...

How to Batch Edit Photos in VSCO Cam 

1. Select, edit and save your photo.

2. Click on the photo you edited and go to the menu button on the bottom right of your library screen (the three little dots). 

3. Click 'COPY EDITS'.

VSCO Cam Batch Editing Tips - Edit Multiple Photos at Once on Your Phone - www.mommatography.com

4. Now select the photos you want to apply your edits to (in the image below, you'll see your photos highlighted with a gold box). 

5. Go to the same three dot menu button, and click 'PASTE EDITS'. 

VSCO Cam Batch Editing Tips - Edit Multiple Photos at Once on Your Phone - www.mommatography.com

There you have it! All those photos will change to look the way your master photo does. Batch editing on your phone. I am loving this little trick.

Stay tuned and check in next week for my first GIVEAWAY! Have a great weekend!


The Best Free Photo Editing Software

Now that we have a few months' worth of tips and tricks to take better photos, I figured it was time to start diving into editing your photos! Before you get all worried or bummed out that you don't own Adobe Photoshop or Lightroom, take a deep breath and hear me out. There are a handful of pretty great FREE photo editing programs that you can use to make your pictures look fantastic. Whether you are a fellow blogger aiming for beautiful photos to draw viewers in, or a mom making a photo book of your kids, these editing programs will help you get closer to your end goal; photos that stand out and look great. 

Here are my top three free photo editing programs:

1. PIXLR (Works on Windows, Mac, Mobile & Web) 

Pixlr is a fun program that has many tools to edit with, a huge library of filters to change the look of your image and similar layering options like photoshop has (grouping your edits by steps in layers). The sidebar has a lot of the same tools that photoshop has to offer as well! You can either download it free for your desktop, get the app for your phone or quickly access it right inside your internet browser (the only negative about that is you have ads that take up space in your editing window). All you have to do is open your image and get started!

Best Free Photo Editing Software Programs - www.mommatography.com

Go to PIXLR.com!

2. GIMP

GIMP is often referred to as one of the closest free editing programs to Photoshop. It is pretty powerful and offers many tools to edit. The tools on the left hand side (shown by icons) have descriptions that come up to help familiarize you with what each tool does. GIMP's website also offers a page of tutorials to help you understand some of the tools and get you started with editing. 

Best Free Photo Editing Software Programs - www.mommatography.com

Go to GIMP!

3. Adobe Photoshop

You thought you read that wrong, right? It's true! Adobe has recently released a free download for Adobe Photoshop CS2. Yes this is outdated, and old, and sometimes unsupported... BUT you can still have access to a version of Photoshop for free. All you have to do is go to adobe.com, create a login, sign in and accept the terms and conditions (they say that adobe doesn't recommend that you download older versions of the software..) and pick your preferred language. You can also download the other Adobe CS2 suite for free, including Illustrator, InDesign and more.  

Behind the Scenes - In-Home Lifestyle Family Session

My wonderful brother and sister in law just moved to Arizona and I had the privilege of staying with them, just a few days after they had moved in! We had little to work with, as the rest of their belongings were being shipped across the Pacific Ocean from Hawaii. We really made this session simple and only used a bed, a sheet and a few white pillows for an in-home, lifestyle family photoshoot. Today I'm going to take you behind the scenes and give you some simple tips to get great photos in the home. 

1. Don't over complicate things!

Sometimes it's so easy to get crazy with props, outfits, blankets, and accessories. I think some photos become more about all those extra things, rather than focusing on the people in the photo. I love keeping things simple, clean and natural.  

hatchfamily-13.jpg

2. If there is a baby, make sure the baby is warm and well fed - that applies to the other kids too!

Crankiness and crying bring red faces and a lot of wiggles. Having the baby fed before hand helps a lot; I also had small easy snacks close by for the kids. It felt more like jumping on the bed, having a snack and snuggling than a photoshoot. Happy kids = happy photos. Simple as that. 

In-Home Lifestyle Tips
In-Home Family Lifestyle Photos - Tips for Keeping it Simple - www.mommatography.com


3. Allow for enough time to shoot and don't rush things. 

I loved being able to spend some quality time with this cute family and not have to rush things. In almost all of my sessions that involve a newborn, we'll have to take little breaks for nursing, calming the baby, or even making sure the older siblings are cheerful and happy. If it feels rushed it will be stressful and the pictures will show it! 

In-Home Lifestyle Family Photography Session - Behind the Scenes & Tips for Great Photos at Home - www.mommatography.com
in home family photos
In-Home Family Lifestyle Photos - Tips for Keeping it Simple - www.mommatography.com

4. Let the family be natural; don't stage everything or over-pose (I might have made that phrase up, but it sounds good to me). 

All I did for this shoot was tell them how to sit on the bed for the group shot. Everything else was candid and those are some of my favorite photos. Even if things get ugly with tears and meltdowns, it's okay to snap a few photos. Let them be their true every-day selves. It's real life. 

In-Home Lifestyle Family Photography Session - Behind the Scenes & Tips for Great Photos at Home - www.mommatography.com
In-Home Family Lifestyle Photos - Tips for Keeping it Simple - www.mommatography.com

5. Don't ever tell the kids to smile. Just make them laugh.

You know what I'm talking about. You say 'Okay, now SMILE!' and you get the world's most forced and irritated happy face. I steer clear of that. I tell them stories, make jokes and try to keep it light hearted. For these family shots, I played peek-a-boo behind the bathroom wall and that's all I needed to get happy expressions. It turned into a fun game for the girls. Okay, I might have done some really silly dancing as well; whatever it takes for million-dollar smiles, right??

In-Home Family Lifestyle Photos - Tips for Keeping it Simple - www.mommatography.com

6. Try and be discrete. 

I love standing by, trying not to let the kids know I am taking pictures. If you are documenting more than directing, you can get really great moments and the kids aren't bugged that a big annoying camera is in their face. This was my favorite shot of the whole day; the littlest sister jealously looking on at the new center of attention. She is the cutest thing. I wanted to take her home with me. 

In-Home Family Lifestyle Photos - Tips for Keeping it Simple - www.mommatography.com

7. Find the room that has the most natural-light.

Lighting is key to great photos. I always search for the best-lit room and let all that beautiful light flood in. If the master bedroom is dark, try moving to the living room if it has bigger windows. Shoot in different directions, towards the light source and letting the light fall on the subject. The quicker you learn about lighting and how to find good lighting, the better your pictures will be! 

In-Home Family Lifestyle Photos - Tips for Keeping it Simple - www.mommatography.com

Practice taking lifestyle photos at home with your own kids or ask friends, if you'd like to take better family photos. What better place to shoot than where a family is most comfortable - in their own home. 


Processing Raw Files

If you missed my post last week on Shooting in Raw vs. JPEG, be sure a read it through. It will help you understand this post a little better. SO now that you understand the difference between shooting in Raw vs. shooting in JPEG, what do you do with all those Raw files?? Here's a few pointers to get you going in the right direction for converting Raw files.

If you shoot with a Canon camera, your camera should have come with the DPP (Digital Photo Professional) software disk. You can install this software to your computer, find the folder of your RAW photos, and export them as JPEGS. To save them in a different format go to File - Convert and Save. You can also batch process them (convert the whole folder all at once) by going to File - Batch Process. That window will let you choose where to save them, what to name them and select your quality. Play around with this software if you don't want to spend more for another post-processing program. 

If you shoot with a Nikon camera, you can process your NEF files using the software that came with your camera; this is most likely View-NX or View-NX 2. Here's a tutorial on how to convert Raw files with this software. 

If you are using a Mac, you can edit Raw files in Photos (the new version of iPhoto). When you import Raw files into iPhoto, it will automatically show your photo as a JPEG version. To access your Raw file you have to click 'Edit' to edit the image. After that, under the image menu, you have to select 'use Raw as original'. Once your edits are saved, it will show as a Raw file.

Google had a program called Picasa which was FREE and can also process Raw files. They have since discontinued Picasa, but if you have it downloaded already, you can still use it. For detailed instructions on how to convert Raw files to JPEG files using Picasa, check out this tutorial

If you own Photoshop, you can process your Raw files with Camera Raw. This window will open up your Raw files, and here you can make your edits without losing any information with your file. Simply edit the photo how you want it, and click open image. Once it opens in photoshop, you can then save it in any other file format. 

Converting Raw Files in Photoshop - www.mommatography.com

Lightroom is my favorite software for post-processing my images. Don't get me started on that though; we will talk about Lightroom soon! To convert Raw files in Lightroom, go to File - Import. Import the photos you want, and make your edits in the Develop window. Once you are done, click on your files and go to File - Export. Here you will choose the location, file name, etc. Make sure you choose JPEG if that's the format you want your new files to be. 

I like to convert my Raw files to DNG files, using Adobe's Digital Negative Converter. DNG files are more universal, they are smaller than Raw files but are still lossless (contain the full image data and aren't compressed). You can select your folder of images, choose where to save them and what to rename the files. When ready, click convert and they will batch process! Here's what that window looks like:

Convert Raw Files to DNG - www.mommatography.com

Hopefully your Raw to JPEG process makes a little more sense now. Visit my contact page and shoot me an email if you have any further questions!!