Tips for Taking Great Photos of Kids

Kids are one of my most favorite subjects to photograph. They are energetic, happy, hilarious and they don't care what anybody thinks. BUT, every once in a while, those adorable, joyful, carefree kids get tired, hungry, bothered, bored, mad, sad or frustrated. Any one or combination of those can turn a hopeful photo shoot into a no good, very bad day for both the child and the parents. If you are prepared ahead of time, you can capture great candid shots of kids with shining with their best smiles.

These are my seven tips for getting great photos of kids:

  • Don't let the kids feel pressure of having to smile and behave their absolute best, or else. Everyone wants perfect photos of their kids, which usually leads to enormous amounts of stress. Be cool and calm and make it a fun experience; make it an adventure, and not a threat.

Tips for Taking Great Photos of Kids - www.mommatography.com
  • Get on their level. When I start a session with kids I always find ways to relate to them and find out what they are all about- favorite movies, characters, toys, treats, music or anything that puts me on their side and not another adult making them do something they might not be that excited about. It's okay to let them bring a favorite toy. When you get them talking about things that make them happy, you're bound to have a few genuine smiles. Become their friend! 

Tips for Taking Great Photos of Kids - www.mommatography.com
  • Get them laughing. When parents tell kids to smile for the camera or say cheese, they quickly remember why they don't want to be there. I love having a sibling or parent behind my camera making funny faces or telling inside jokes to get them laughing! Families know how to make each other laugh even if one of them is grumpy. If I'm the only one working for a smile, I have no shame in being silly to get someone to smile.

Great Tips for Photographing Kids - www.mommatography.com
  • Bring assistants to help you out. By this I mean TREATS. I always carry a pack of Skittles or M&Ms for a quick reward- especially for those that might be too young to reason with. If the water works and tantrums have started, they usually will at least sit still and savor a small treat for a few happy seconds. A toddler chewing is better than a toddler screaming 😂. I also bring bubbles (what kid doesn't love them) and if I know a baby will be there, some kind of toy that makes noise to get them to look up at the camera. This can be a huge help!

Tips for Taking Great Photos of Kids - www.mommatography.com
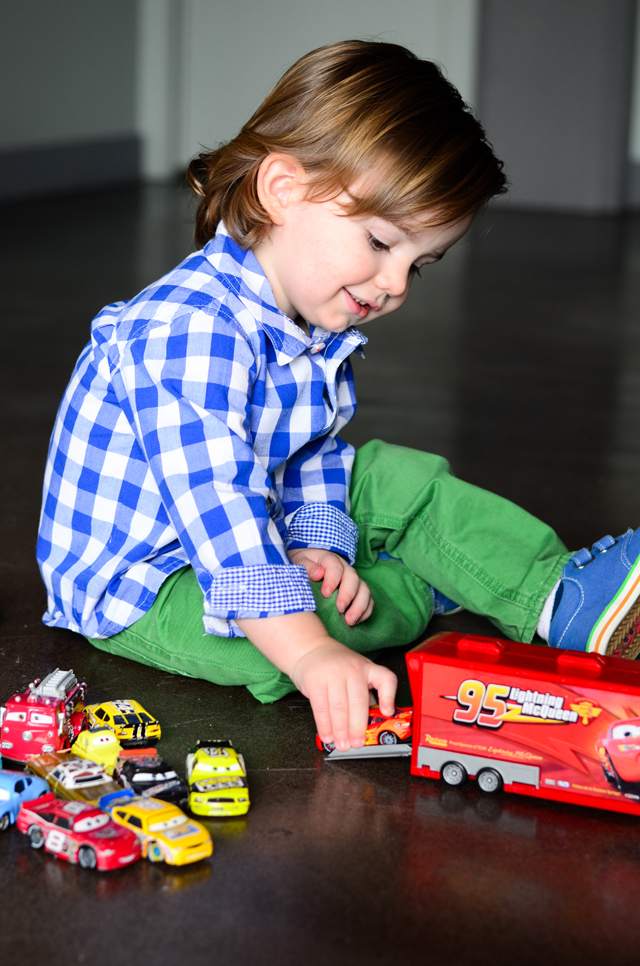
  • Try not to force it. If they aren't happy or cooperating just take a break and let them play! I'll have them explore the location and get their mind off of photos. I get the best candid shots when kids are in their element; exploring, running, playing and laughing. Mix things up and get them moving, let them be themselves. 

Tips for Taking Great Candid Photos of Kids - www.mommatography.com
  • Give the parents a heads up before the shoot to make sure their little ones are fed and well-rested. Even the happiest of kids fall apart if they are being told to sit up and smile at a stranger when it's well past nap time. My photo shoots of families that have young kids go much better if they are in the morning or after nap time. 

Taking Great Photos of Kids - www.mommatography.com


  • Kids can easily sense tension. If a parent (or better yet both) is stressing out, help them relax and have them let you take the reins. Bring the fun back to the shoot, let the kids be themselves and just have a good time.

Tips for Taking Pictures of Kids - www.mommatography.com
Tips for Taking Great Candid Photos of Kids - www.mommatography.com

Taking pictures of kids should be a fun experience, not a terrible one. Take your time and relax, trying your best to allow them to have fun. If they think they are just in a new place, exploring and getting to play, you will get great genuine smiles and really good candid shots of kids!  


Depth of Field

Depth of Field (DOF) is the distance between the closest and farthest parts of your image that are sharp, or in focus. Before composing your photo you have to make a choice. Is it important that the scene before appears clear and sharp to soak up all the details? Do I want to hide distracting objects, messy walls, or bring my audience in on just the foreground? This varies from subject to subject and of course, with your personal preference. Depth of field is a term that relates directly with your aperture. Be sure to read and review my post about aperture

I find that if I am shooting a large landscape scene, I want to achieve a sharp image and bring the entire scene to life. I usually photograph using a higher aperture (f/stop) somewhere between f/11-f/22 to get the details in the distant trees or mountains, clear.

Understanding Depth of Field - www.mommatography.com

This is the kind of scene (above) I want to use a deep DOF. It wouldn't look as good enlarged to a 30"x40" print if I shot with a shallow depth of field, such as f/4. I need a larger f/stop number to get those distant mountain ranges clear. I shot this with an aperture of f/16. 

Depth of Field for Landscapes - www.mommatography.com

I shot this image above at about 7:00 in the morning when the sun was just rising. Since I wanted to shoot with a higher f/stop to get a deep depth of field (more in focus through my image) I knew I would need a longer shutter speed. This is where it is key to use a tripod. Shooting in dimmer lit scenarios means you need more light - to get more light in your image you either have to have a slower/longer shutter speed, a higher ISO number (review my post about ISO here) or open your aperture to a smaller f/stop number. I couldn't bend with my f/stop number and I wanted a low ISO setting (to avoid adding grain - remember the higher your ISO the more grainy your image will be). Using a tripod was the best solution by allowing me to use a slower shutter speed without having camera shake. I shot this image at f/16 and 1/4th of a second. 

Shallow Depth of Field Example - www.mommatography.com

This is an example of using shallow depth of field with a landscape. Sometimes you'll want to focus on your foreground and blur the background; in this case I shot at f/3.5 so I can see some of the ridges in the mountains. If I shot at f/2.8 the mountain range might not be as recognizable, like I wanted it to be. 

Shallow Depth of Field Landscape - www.mommatography.com

Here's another example of using a shallow depth of field for a landscape. Focusing on the branch instead of my whole scene adds a lot more interest in this shot. 

Understanding Depth of Field - www.mommatography.com

If I am photographing my kids and taking a simple portrait, I like to have just enough of their face in focus and blur the background. This ensures that the photo is all about them, not the greasy handprints on the wall behind their head, the dishes I left out on my kitchen sink, or dirty socks on the floor. You can take great portraits inside your own house and get that fun lifestyle element without showing too many details in the room behind your subject. You can also tell a fun story by using a shallow depth of field. 

Depth of Field Examples - shallow depth of field - www.mommatography.com

I also use a shallow DOF a lot with newborn photography; focusing on their little feet or hands. In this case, I want a shallow DOF with my aperture (f/stop) around f/2.8-f/4. This draws the eye to the certain part of the image or subject that is in focus and creates a softer feel. I love the way it highlights the little details of a newborn baby. 

Understanding Depth of Field - www.mommatography.com

Brainstorm about what kind of images you want to take and practice using a shallow or deep depth of field to get the right mood and focus that you want in your photos. Hopefully when people refer to 'depth of field' you can understand what they mean a little better. 


Feature Friday - Food Photography & Styling Tips from The Gathering Table

The first Friday of every month will be Feature Friday. Mommatography will showcase photographers, artists, and fellow bloggers to share their unique talents and skills. This week's post comes from a friend and food photographer Sheena Bates. Check out her blog and follow The Gathering Table. If you are a food blogger, or want to improve your food photography, today's post is full of great styling and composition tips. 


Hi! I’m Sheena Bates from The Gathering Table. I’m super excited to be here and share some tips on food photography. Just to give you a little background on myself, I’m originally from Utah and attended Utah Valley University  where I got my BFA in photography. That is where I discovered food photography and how much I love it. I now live in London with my husband and two year old son. My husband is a photographer as well. I’ve done a few commercial shoots for various restaurants and catering companies both in Utah and in London. I started the Gathering Table when I was in school and have been on and off with blogging till now, when I’ve decided to really get into it. I love that it allows me to follow my passion, while still being at home with my son.

Food photography is awesome! In my humble opinion, it is truly the best genre of photography, because it’s something that we can all relate to. After all, we all eat, right? And who doesn’t have a memory that is tied so closely with food, that seeing a lovely, composed shot of something delicious will take you right back? That is why I love shooting food. That and you don’t have to try to coax little ones to smile naturally. 

Food Photography Styling Tips - Sheena Bates - The Gathering Table

On to the good stuff! Let’s talk styling. There is no one way to style a dish. I typically like to think about what it is that I’m styling. What images come to mind when I think of that food. Let’s take soup for example: soup is (usually) warm; something you have at home, a comfort food. So I may go more rustic with my styling, playing with warm tones, worn or as I like to think of it, loved props. Fish, on the other hand, has to be fresh, can be warm or cold, and typically has a lighter, lower calorie connotation. So I would use lots of greens in my styling, fresh herbs and go for a lighter, airier look. The styling and the lighting of your image is really what will create the mood for your food photos. 

After deciding upon my mood, I gather props. Here you can go very busy, or simple. Like Alise mentioned in the intro post to food photography, charity shops (thrift stores) are a great place to look for props. Scraps of fabric, napkins, ingredients that are in the dish, and other dishes such as glasses, utensils all make great props to style your photo.

Food Photography Styling Tips - Sheena Bates - The Gathering Table

 [rice and beans: iso 800 f/3.5 1/100 sec] [couscous with lamb and peas: iso 800 f/2.8  1/500 sec]

For the rice and beans photo I included a lot of props (there were more on the other side of the dish). To tell more of a story, you can use the ingredients that are in the dish to help style your photo. It is also helpful to use a pan or pot that the dish may have been cooked in (I usually don’t use the actually pot or pan that it was cooked in, but will transfer it to a clean one, so there aren’t any spills—unless that looks add to the look and story I’m going for—see what I mean about no one way to style?). The image on the right, the couscous, lamb and peas, has a much more simple approach. There are really only three things in the photo: the napkin, the dish and the water. It still works though because of the garnishes: the yoghurt and the herbs. Can you imagine if it was just couscous and lamb? Wouldn’t look very appetizing! 

I love to try to tell a story when I style. I think about what would really be on the table or counter if someone were making the dish. Another way to do this would be shooting the different steps in recipe, but in an artful way.  

Food Photography Styling Tips - Sheena Bates - The Gathering Table

[thumbprint cookies: iso 800 35 mm f 4.5 1/640 sec] [chocolate cookies: iso 1600 50 mm f/3.5 1/125 sec]

The image on the left, the thumbprint cookies, tells a story about packaging food gifts for neighbors at Christmas time. Of course, no one would have a scene exactly like this, but it tells the story. The chocolate cookies, on right, tells about the baking process, while showing the final result. 

Food Photography Styling Tips - Sheena Bates - The Gathering Table

[rolling dough: iso 400 50 mm f/2.2 1/500] [cutting dough, left: iso 400 50 mm f/2.2 1/250] [cutting dough, right: iso 400 50 mm f/2.2 1/250]

These set of images show the process of rolling out the cookie dough and cutting it out, but it’s not your typical step by step photo. Think outside the box a little. 

Let’s talk composition. Don’t be afraid to cut off part of the dish. There is no rule that you have to include the whole thing. Think about the rule of thirds, but don’t feel married to it. It’s helpful when shooting to try many different angles. Get overhead, get it at 45º, and everything in between. 

Food Photography Styling Tips - Sheena Bates - The Gathering Table

This diptych is the exact same setting. Nothing has moved but the camera (the lens changed too). But they’re very different! And you can see, the one on the right I cut part of the bowl of soup off, while the left has most of the scene. 

Food Photography Styling Tips - Sheena Bates - The Gathering Table

[veg soup left: iso 800 50 mm f/2.8 1/100 sec] [veg soup right: iso 800 50 mm f/2.8 1/100 sec]

These images of the vegetable soup show just how different an image can look because of your angle. The one on the left, you catch the reflection at the lower angle, while the one on the right you catch the beautiful colours of the soup. That reflection can give your image a completely different feel. 

Another fun way to compose your images is to play with line. This can make for incredibly simple styled images, but that are still very interesting and catching. 

Food Photography Styling Tips - Sheena Bates - The Gathering Table

[clementines: iso 200 50 mm f/2.8 1/125 sec]

This shot of the clementines plays with diagonal line. There is actually very little going on in the photo. Because of the dynamic diagonal line created by the placement of the fruit, it works and it interesting.

using line 2.jpg

[muffin ingredients: iso 1600 24mm f/4.0 1/100 sec]

This shot of the muffin ingredients uses line, or a grid format to add interest to what would be a boring photo of ingredients. 

I hope this was helpful with your food photography. I’d love to hear from you and see your progress. Feel free to drop me a line sheena@sheenabates.com and be sure to head over to The Gathering Table and follow my posts. You can also find me on instagram: @gatheringtable. Hope to see you there.


Intro to Food Photography & The Perfect Pie Crust

For thanksgiving this year I made three pies; the most I've ever made all at once. My Granddad is famous for his pie making skills and my Dad has carried on the tradition. I have a lot to live up to in the pie world, but I love making them and they are easily one of my favorite desserts! 

When I want to photograph food, I think first about what I want my surface to be and what kind of background or backdrop I want in my photo; getting these right will compliment the subject matter. You could say I'm more of a minimalist when I shoot; I start with the key parts of my photo and selectively add a few props in as I go. I shot these using only natural light, with a wooden box as my table and my sweet mother in law holding the backdrop behind me. I'll include what settings I used which hopefully will be helpful for you. 

Food Photography Tips - www.mommatography.com

F/2.8, 1/100, ISO 3200

Food Photography Tips - www.mommatography.com

F/2.8, 1/100, ISO 3200             For the rest of the images I used F/2.8, 1/125, ISO 2500

Food Photography Tips - www.mommatography.com

Watch my Facebook page (like us if you haven't already!) and instagram (@mommatography) for my favorite Apple Pie recipe on an upcoming feature! It's amazing, if you can't tell from that glaze. 

Food Photography Tips - The Perfect Pie Crust - www.mommatography.com
Food Photography Tips - Choose your lighting carefully - www.mommatography.com

Make sure you are aware of your lighting when photographing. For the photo on the left, the tungsten lights in my kitchen were on. Shooting with the lights on will make your photos warmer since the tungsten light is more yellow. Mixed lighting can make it hard to get your white balance to look good. I turned the lights off for the photo on the right and just used the natural light from my door. I prefer just using natural light in most cases; it's not as harsh and the tungsten light made my pies way too orange. I use my Kelvin scale to set my white balance; we will cover more about white balance soon. 

For this image below I actually liked the warmer tones from having my lights on. It made it look a little more golden, and who doesn't want to dive into a pie that is perfectly golden brown with a sugar glazed crust! I shot all of these using my 50mm f/1.8 lens. I love this lens for food photography. 

Food Photography Tips - www.mommatography.com

Play around with different color themes, textures and props. For this pie I just used a piece of burlap underneath it. Sometimes your closest thrift store is the best place to look for props; old pans, colorful dishes and plates, vintage forks and knives, towels and placemats. I love searching for new props. Antique stores are great too. Notice the difference my background makes in both of these photos below; one is light and makes a nice bright scene and the dark one really draws the focus in on the pie. I like both of them, but the mood is completely different. Check back soon for products & supplies I recommend for shooting food, products and portraits at home. 

Food Photography Tips - www.mommatography.com

My Recipe & Tips for the Perfect Pie Crust:

  • 1 1/2 cups all-purpose flour

  • 1/4 tsp salt

  • 1/2 c. and 2 TBS butter (very cold) 

  • 1/4 c. and 2 TBS ice water

In a mixing bowl, combine the flour and the salt. Use a knife to dice up the chilled butter, then using a pastry cutter, cut the butter into the flour until it resembles coarse crumbs. Add the ice water one tablespoon at a time, being careful not to get the dough too wet. Continue this process until it forms a ball. With pie crust, it's important not to overwork the dough (like kneading bread dough). You want the bits of butter to stay cold. Refrigerating the dough for a few hours or over night will help when rolling and shaping your pie crust. Allow the crust to sit out from the fridge for at least 30 minutes before rolling, or it's tough to roll out. I roll my dough once, fold in the edges to form a ball and then roll it out again to make a perfect circle. 

Use your rolling pin to roll the pie crust up and place it easily in your pie pan. I then fold over the lip of the crust along the edges to make it thicker, and (see the images above) using my knuckle, shape the crimps into the crust. 

Recipe adapted from here.

My girls were pretty busy making their own beds out of rugs and backdrops while they waited for the pies to finish cooking. They will find anything to use as a blanket these days! Maybe I shouldn't have them running around in just diapers in November :) Funny things happen when mom is busy cooking and taking photos in the kitchen... 


Black Friday Deals on Camera Gear

Everyone loves a good deal. Black Friday is just around the corner and I decided to feature some amazing Black Friday sales on cameras and other gear that are too good to pass up! It's worth looking into to save (in a lot of cases) hundreds of dollars. If you're shopping around, think first about what you're looking for and watch out for bundles. If they include a lens you know you won't use much, steer clear of that and save your cash for a lens you really want. Another way to save big is by considering purchasing a previous model of a camera body. Remember, if you are starting out, there are a lot of amazing cameras out there and you don't always have to feel pressure to buying the latest and greatest! Let's get to the deals!

Black Friday Sales on Cameras and Camera Gear - www.mommatography.com

DSLR Cameras:

If you're looking at a beginner DSLR camera, this deal on the Nikon D3200 with two lenses is a good buy. You save $480.00 on this bundle, giving you the 18-55mm kit lens and a zoom lens, with the camera body for only $396.95! They basically give you the zoom lens for free. We can't complain about that. 

To get the newer edition of this camera with one lens, the Nikon D3300 with the 18-55 kit lens will be $399.00 on best buy; also a good deal if the newer camera means more to you. 

The Canon EOS Rebel SL1, is on sale for $449.00 (saving $250) and you can even get it in white if that sounds fun to you!

This Nikon D7100 bundle price will drop to $999.00 on Best Buy, which is a great deal saving you $700! This is a great Nikon camera for those looking into a step above the more affordable entry-level DSLRs. 

The Canon Rebel T5 with two lenses will be on sale for $399.99 on Best Buy, saving you $350. 

If you're looking for an awesome full-frame camera or want to upgrade, the Canon 7D Mark II DSLR body is on sale for $1,299.00 ($500 off). 

For Best Buy's full Black Friday ad for Cameras click here. To review and read my article about my top picks for entry-level DSLRs click here

Point & Shoot Cameras:

If a DSLR seems like a burden to carry around and you're looking for more compact camera, consider a point and shoot. This deal saves you $250 on the Sony Alpha a6000. This is an amazing mirrorless camera that has a great sensor (same as most entry-level DSLRs), offers manual modes, allows you to shoot in a RAW format, shoots HD video and has wi-fi sharing. The price is $548.00, and this link will get you a hidden bundle that comes with a bag, a card, two batteries and a charger for the same price as just the camera! The previous model, the Sony Alpha a5000 is also amazing and is on sale for $398.00. My sister has this and she loves it. 

The Canon Powershot ELPH is a lower-priced popular point and shoot, and it's on sale for $159.00. It offers 20.2 megapixels, HD video, and wi-fi sharing. Some reviews say that the image quality from this camera is fine for everyday sharing and social media, but not as great as they hoped for. My advice- always be sure to check the reviews to get a better idea if the product is right or not for you. This seems like an easy buy for the low price but the image quality might be a little lower.  

The Canon Powershot G7 X is a point and shoot that boasts high quality images with its great sensor and fast lens. Save $150 and get this little camera for $549.00. The battery life isn't the greatest, but people seem to love the results when shooting with this one. 

Lenses:

This Nikon macro & portrait lens bundle gets you two lenses for $496, saving you $320! This is a great deal. 

If you shoot Canon and want a telephoto lens that is good for shooting in the outdoors with enough light, or don't mind using a tripod, this Canon EF 75-300mm lens is only $179.00.  

Other Gear:

Get a 32GB SD card for only $14.99! This one ends in two hours on amazon.

Need an external drive for photo and/or video storage? This Western Digital 4TB drive is $40 off for only $119.00 (this is for Mac OSX users). 

This Tamrac bag has great reviews and can be used as a backpack or a sling bag. It is on sale for $69.95 saving you $60.

For the outdoorsy type, this Clik Elite Obscura backpack is bright and fun and is only $69.95, saving you just over $100. 

If you are looking for something more fashionable, like this really cute lavender Kelly Moore bag, it's on sale for $199, saving you almost $60. This is a good deal for this great brand. 

This fun ZLYC vintage bag is on sale for $155, saving you $195! 

If you need a tripod or a bag and purchase one of their qualifying camera accessories, you can get a $50 credit from amazon on future camera or lens purchases. 

Good luck shopping!